- What is VMware Cloud Foundation (VCF)?
- Why VCF? Business Value & Use Cases
- VCF Licensing Explained
- VCF Architecture Deep Dive
- VCF Hardware Requirements & Bill of Materials
- VCF Networking with NSX — Deep Dive
- VCF Storage: vSAN OSA vs ESA
- VCF Workload Domains Explained
- VCF Day 2 Operations
- Installing VCF 9.1 Step-by-StepYou are here
VMware Cloud Foundation 9.1 is Broadcom’s flagship integrated SDDC platform, bundling vSphere, vSAN, NSX-T, and SDDC Manager into a single lifecycle-managed stack. This guide is a full engineering deep-dive — from bare-metal host preparation through management domain bringup, NSX-T topology construction, workload domain deployment, and Day 2 operations. Every command, every JSON field, every common failure mode is covered.
What’s New in VCF 9.1
Cloud Builder 9.1 introduces a redesigned JSON schema with per-host granular NIC assignments, removing the previous limitation of a single global DVS spec. vSAN ESA (Express Storage Architecture) is now the default and only supported storage architecture for new VCF 9.1 deployments — OSA is not available for greenfield installs. ESA requires NVMe drives exclusively; SAS and SATA SSDs are not supported in ESA mode at all. NSX-T 4.1 introduces simplified BGP peer configuration directly in SDDC Manager, eliminating manual NSX-UI steps for Tier-0 upstream peering. vCenter Server 9.1 ships with Aria Operations integration built in, and the SDDC Manager 9.1 dashboard now exposes real-time vSAN health, certificate expiry, and license consumption in a single view. IPv6 management networks are fully supported for the first time.
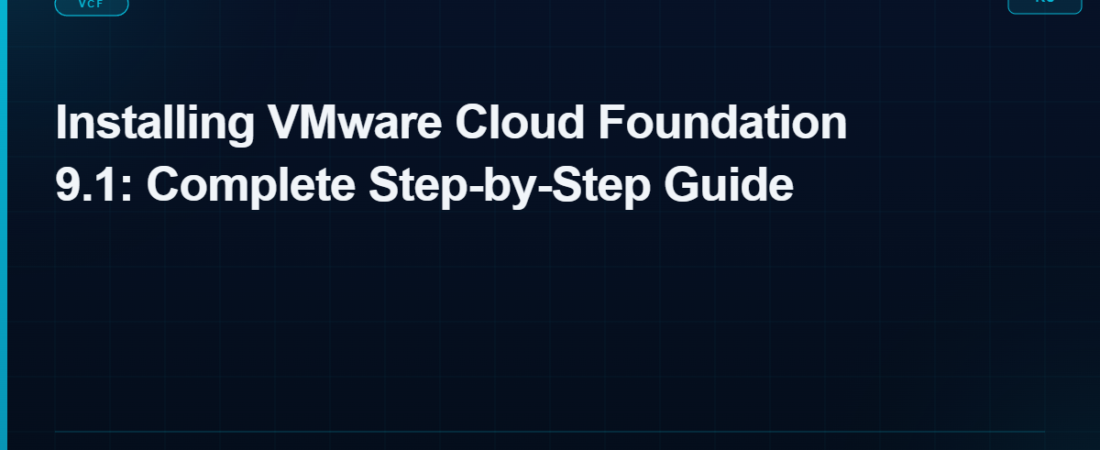
Architecture Overview
%22%2F%3E%0A%3Crect%20width%3D%22900%22%20height%3D%223%22%20fill%3D%22%2306b6d4%22%2F%3E%0A%3C!--%20grid%20--%3E%0A%3Cg%20stroke%3D%22rgba(6%2C182%2C212%2C0.05)%22%20stroke-width%3D%221%22%3E%0A%20%20%3Cline%20x1%3D%220%22%20y1%3D%2260%22%20x2%3D%22900%22%20y2%3D%2260%22%2F%3E%3Cline%20x1%3D%220%22%20y1%3D%22120%22%20x2%3D%22900%22%20y2%3D%22120%22%2F%3E%0A%20%20%3Cline%20x1%3D%220%22%20y1%3D%22180%22%20x2%3D%22900%22%20y2%3D%22180%22%2F%3E%3Cline%20x1%3D%220%22%20y1%3D%22240%22%20x2%3D%22900%22%20y2%3D%22240%22%2F%3E%0A%20%20%3Cline%20x1%3D%220%22%20y1%3D%22300%22%20x2%3D%22900%22%20y2%3D%22300%22%2F%3E%3Cline%20x1%3D%220%22%20y1%3D%22360%22%20x2%3D%22900%22%20y2%3D%22360%22%2F%3E%0A%20%20%3Cline%20x1%3D%220%22%20y1%3D%22420%22%20x2%3D%22900%22%20y2%3D%22420%22%2F%3E%3Cline%20x1%3D%220%22%20y1%3D%22480%22%20x2%3D%22900%22%20y2%3D%22480%22%2F%3E%0A%20%20%3Cline%20x1%3D%220%22%20y1%3D%22540%22%20x2%3D%22900%22%20y2%3D%22540%22%2F%3E%3Cline%20x1%3D%220%22%20y1%3D%22600%22%20x2%3D%22900%22%20y2%3D%22600%22%2F%3E%0A%3C%2Fg%3E%0A%3C!--%20Title%20--%3E%0A%3Ctext%20x%3D%22450%22%20y%3D%2230%22%20fill%3D%22%2306b6d4%22%20font-family%3D%22Inter%2Csans-serif%22%20font-size%3D%2214%22%20font-weight%3D%22700%22%20text-anchor%3D%22middle%22%20letter-spacing%3D%223%22%3EVMware%20Cloud%20Foundation%209.1%20%E2%80%94%20Architecture%3C%2Ftext%3E%0A%0A%3C!--%20ROW%201%3A%20Cloud%20Builder%20%2B%20SDDC%20Manager%20%2B%20NSX%20Manager%20Cluster%20--%3E%0A%3C!--%20Cloud%20Builder%20--%3E%0A%3Crect%20x%3D%2230%22%20y%3D%2248%22%20width%3D%22155%22%20height%3D%2276%22%20rx%3D%227%22%20fill%3D%22%230c2230%22%20stroke%3D%22%2306b6d4%22%20stroke-width%3D%221.5%22%2F%3E%0A%3Ctext%20x%3D%22107%22%20y%3D%2273%22%20fill%3D%22%2306b6d4%22%20font-family%3D%22Inter%2Csans-serif%22%20font-size%3D%2210%22%20font-weight%3D%22700%22%20text-anchor%3D%22middle%22%3ECLOUD%20BUILDER%3C%2Ftext%3E%0A%3Ctext%20x%3D%22107%22%20y%3D%2288%22%20fill%3D%22%2394a3b8%22%20font-family%3D%22Inter%2Csans-serif%22%20font-size%3D%228%22%20text-anchor%3D%22middle%22%3Ev9.1%20OVA%20Appliance%3C%2Ftext%3E%0A%3Ctext%20x%3D%22107%22%20y%3D%22103%22%20fill%3D%22%2364748b%22%20font-family%3D%22Inter%2Csans-serif%22%20font-size%3D%228%22%20text-anchor%3D%22middle%22%3EJSON%20Bringup%20Engine%3C%2Ftext%3E%0A%3Ctext%20x%3D%22107%22%20y%3D%22115%22%20fill%3D%22%2364748b%22%20font-family%3D%22Inter%2Csans-serif%22%20font-size%3D%228%22%20text-anchor%3D%22middle%22%3EPre-check%20Validator%3C%2Ftext%3E%0A%0A%3C!--%20Arrow%20CB%20%E2%86%92%20SDDC%20--%3E%0A%3Cline%20x1%3D%22185%22%20y1%3D%2286%22%20x2%3D%22218%22%20y2%3D%2286%22%20stroke%3D%22%2306b6d4%22%20stroke-width%3D%221.5%22%20stroke-dasharray%3D%224%2C3%22%20marker-end%3D%22url(%23arr)%22%2F%3E%0A%0A%3C!--%20SDDC%20Manager%20--%3E%0A%3Crect%20x%3D%22220%22%20y%3D%2248%22%20width%3D%22170%22%20height%3D%2276%22%20rx%3D%227%22%20fill%3D%22%230c2230%22%20stroke%3D%22%2306b6d4%22%20stroke-width%3D%222%22%2F%3E%0A%3Ctext%20x%3D%22305%22%20y%3D%2273%22%20fill%3D%22%2306b6d4%22%20font-family%3D%22Inter%2Csans-serif%22%20font-size%3D%2210%22%20font-weight%3D%22700%22%20text-anchor%3D%22middle%22%3ESDDC%20MANAGER%3C%2Ftext%3E%0A%3Ctext%20x%3D%22305%22%20y%3D%2288%22%20fill%3D%22%2394a3b8%22%20font-family%3D%22Inter%2Csans-serif%22%20font-size%3D%228%22%20text-anchor%3D%22middle%22%3ECentral%20Control%20Plane%3C%2Ftext%3E%0A%3Ctext%20x%3D%22305%22%20y%3D%22103%22%20fill%3D%22%2364748b%22%20font-family%3D%22Inter%2Csans-serif%22%20font-size%3D%228%22%20text-anchor%3D%22middle%22%3ELifecycle%20%2F%20Patching%20%2F%20Certs%3C%2Ftext%3E%0A%3Ctext%20x%3D%22305%22%20y%3D%22115%22%20fill%3D%22%2364748b%22%20font-family%3D%22Inter%2Csans-serif%22%20font-size%3D%228%22%20text-anchor%3D%22middle%22%3EPassword%20Mgmt%20%2F%20Bundles%3C%2Ftext%3E%0A%0A%3C!--%20Arrow%20SDDC%20%E2%86%92%20NSX%20--%3E%0A%3Cline%20x1%3D%22390%22%20y1%3D%2286%22%20x2%3D%22423%22%20y2%3D%2286%22%20stroke%3D%22%23a78bfa%22%20stroke-width%3D%221.5%22%20stroke-dasharray%3D%224%2C3%22%20marker-end%3D%22url(%23arr)%22%2F%3E%0A%0A%3C!--%20NSX-T%20Manager%20Cluster%20--%3E%0A%3Crect%20x%3D%22425%22%20y%3D%2248%22%20width%3D%22200%22%20height%3D%2276%22%20rx%3D%227%22%20fill%3D%22%230f1a30%22%20stroke%3D%22%23a78bfa%22%20stroke-width%3D%221.5%22%2F%3E%0A%3Ctext%20x%3D%22525%22%20y%3D%2270%22%20fill%3D%22%23a78bfa%22%20font-family%3D%22Inter%2Csans-serif%22%20font-size%3D%2210%22%20font-weight%3D%22700%22%20text-anchor%3D%22middle%22%3ENSX-T%20MANAGER%20CLUSTER%3C%2Ftext%3E%0A%3Ctext%20x%3D%22525%22%20y%3D%2285%22%20fill%3D%22%2394a3b8%22%20font-family%3D%22Inter%2Csans-serif%22%20font-size%3D%228%22%20text-anchor%3D%22middle%22%3E3-Node%20Active%2FActive%20HA%3C%2Ftext%3E%0A%3Crect%20x%3D%22440%22%20y%3D%2295%22%20width%3D%2255%22%20height%3D%2218%22%20rx%3D%223%22%20fill%3D%22%231a1040%22%2F%3E%0A%3Ctext%20x%3D%22467%22%20y%3D%22107%22%20fill%3D%22%23a78bfa%22%20font-family%3D%22Inter%2Csans-serif%22%20font-size%3D%227%22%20text-anchor%3D%22middle%22%3ENSX%20Mgr%201%3C%2Ftext%3E%0A%3Crect%20x%3D%22503%22%20y%3D%2295%22%20width%3D%2255%22%20height%3D%2218%22%20rx%3D%223%22%20fill%3D%22%231a1040%22%2F%3E%0A%3Ctext%20x%3D%22530%22%20y%3D%22107%22%20fill%3D%22%23a78bfa%22%20font-family%3D%22Inter%2Csans-serif%22%20font-size%3D%227%22%20text-anchor%3D%22middle%22%3ENSX%20Mgr%202%3C%2Ftext%3E%0A%3Crect%20x%3D%22566%22%20y%3D%2295%22%20width%3D%2255%22%20height%3D%2218%22%20rx%3D%223%22%20fill%3D%22%231a1040%22%2F%3E%0A%3Ctext%20x%3D%22593%22%20y%3D%22107%22%20fill%3D%22%23a78bfa%22%20font-family%3D%22Inter%2Csans-serif%22%20font-size%3D%227%22%20text-anchor%3D%22middle%22%3ENSX%20Mgr%203%3C%2Ftext%3E%0A%0A%3C!--%20vCenter%20box%20top%20row%20--%3E%0A%3Crect%20x%3D%22645%22%20y%3D%2248%22%20width%3D%22230%22%20height%3D%2276%22%20rx%3D%227%22%20fill%3D%22%230f1a30%22%20stroke%3D%22%2360a5fa%22%20stroke-width%3D%221.5%22%2F%3E%0A%3Ctext%20x%3D%22760%22%20y%3D%2270%22%20fill%3D%22%2360a5fa%22%20font-family%3D%22Inter%2Csans-serif%22%20font-size%3D%2210%22%20font-weight%3D%22700%22%20text-anchor%3D%22middle%22%3EvCENTER%20SERVER%209.1%3C%2Ftext%3E%0A%3Ctext%20x%3D%22760%22%20y%3D%2285%22%20fill%3D%22%2394a3b8%22%20font-family%3D%22Inter%2Csans-serif%22%20font-size%3D%228%22%20text-anchor%3D%22middle%22%3EVCSA%20Appliance%20(8%20vCPU%20%2F%2024GB)%3C%2Ftext%3E%0A%3Crect%20x%3D%22660%22%20y%3D%2295%22%20width%3D%2295%22%20height%3D%2218%22%20rx%3D%223%22%20fill%3D%22%230a1f45%22%2F%3E%0A%3Ctext%20x%3D%22707%22%20y%3D%22107%22%20fill%3D%22%2360a5fa%22%20font-family%3D%22Inter%2Csans-serif%22%20font-size%3D%227%22%20text-anchor%3D%22middle%22%3EDRS%20%2F%20HA%20%2F%20vMotion%3C%2Ftext%3E%0A%3Crect%20x%3D%22763%22%20y%3D%2295%22%20width%3D%2297%22%20height%3D%2218%22%20rx%3D%223%22%20fill%3D%22%230a1f45%22%2F%3E%0A%3Ctext%20x%3D%22811%22%20y%3D%22107%22%20fill%3D%22%2360a5fa%22%20font-family%3D%22Inter%2Csans-serif%22%20font-size%3D%227%22%20text-anchor%3D%22middle%22%3ELifecycle%20Mgr%20(LCM)%3C%2Ftext%3E%0A%0A%3C!--%20Arrow%20down%20from%20SDDC%20to%20Management%20Domain%20--%3E%0A%3Cline%20x1%3D%22305%22%20y1%3D%22124%22%20x2%3D%22305%22%20y2%3D%22148%22%20stroke%3D%22%2306b6d4%22%20stroke-width%3D%221.5%22%20marker-end%3D%22url(%23arr)%22%2F%3E%0A%0A%3C!--%20MANAGEMENT%20DOMAIN%20box%20--%3E%0A%3Crect%20x%3D%2220%22%20y%3D%22150%22%20width%3D%22860%22%20height%3D%22240%22%20rx%3D%2210%22%20fill%3D%22%23080f20%22%20stroke%3D%22%2306b6d4%22%20stroke-width%3D%221.5%22%20stroke-dasharray%3D%226%2C3%22%2F%3E%0A%3Ctext%20x%3D%22450%22%20y%3D%22172%22%20fill%3D%22%2306b6d4%22%20font-family%3D%22Inter%2Csans-serif%22%20font-size%3D%2211%22%20font-weight%3D%22700%22%20text-anchor%3D%22middle%22%20letter-spacing%3D%222%22%3EMANAGEMENT%20DOMAIN%20%E2%80%94%20mgmt-domain-01%3C%2Ftext%3E%0A%0A%3C!--%20ESXi%20Host%201%20--%3E%0A%3Crect%20x%3D%2235%22%20y%3D%22182%22%20width%3D%22190%22%20height%3D%22192%22%20rx%3D%228%22%20fill%3D%22%230c1928%22%20stroke%3D%22%23fbbf24%22%20stroke-width%3D%221.5%22%2F%3E%0A%3Ctext%20x%3D%22130%22%20y%3D%22202%22%20fill%3D%22%23fbbf24%22%20font-family%3D%22Inter%2Csans-serif%22%20font-size%3D%229%22%20font-weight%3D%22700%22%20text-anchor%3D%22middle%22%3EESXi%20HOST%201%3C%2Ftext%3E%0A%3Ctext%20x%3D%22130%22%20y%3D%22215%22%20fill%3D%22%2364748b%22%20font-family%3D%22Inter%2Csans-serif%22%20font-size%3D%227%22%20text-anchor%3D%22middle%22%3E192.168.10.11%3C%2Ftext%3E%0A%3Crect%20x%3D%2245%22%20y%3D%22222%22%20width%3D%22170%22%20height%3D%2218%22%20rx%3D%223%22%20fill%3D%22%231a1505%22%2F%3E%0A%3Ctext%20x%3D%22130%22%20y%3D%22234%22%20fill%3D%22%23fbbf24%22%20font-family%3D%22Inter%2Csans-serif%22%20font-size%3D%227.5%22%20text-anchor%3D%22middle%22%3Evmk0%3A%20Mgmt%20%20vmk1%3A%20vMotion%3C%2Ftext%3E%0A%3Crect%20x%3D%2245%22%20y%3D%22244%22%20width%3D%22170%22%20height%3D%2218%22%20rx%3D%223%22%20fill%3D%22%231a1505%22%2F%3E%0A%3Ctext%20x%3D%22130%22%20y%3D%22256%22%20fill%3D%22%23fbbf24%22%20font-family%3D%22Inter%2Csans-serif%22%20font-size%3D%227.5%22%20text-anchor%3D%22middle%22%3Evmk2%3A%20vSAN%20%20vmk3%3A%20TEP%3C%2Ftext%3E%0A%3Crect%20x%3D%2245%22%20y%3D%22266%22%20width%3D%2280%22%20height%3D%2230%22%20rx%3D%223%22%20fill%3D%22%230f1a0c%22%2F%3E%0A%3Ctext%20x%3D%2285%22%20y%3D%22280%22%20fill%3D%22%2334d399%22%20font-family%3D%22Inter%2Csans-serif%22%20font-size%3D%227%22%20text-anchor%3D%22middle%22%3ENVMe%200%3C%2Ftext%3E%0A%3Ctext%20x%3D%2285%22%20y%3D%22290%22%20fill%3D%22%2334d399%22%20font-family%3D%22Inter%2Csans-serif%22%20font-size%3D%227%22%20text-anchor%3D%22middle%22%3E1.6TB%20ESA%3C%2Ftext%3E%0A%3Crect%20x%3D%22133%22%20y%3D%22266%22%20width%3D%2280%22%20height%3D%2230%22%20rx%3D%223%22%20fill%3D%22%230f1a0c%22%2F%3E%0A%3Ctext%20x%3D%22173%22%20y%3D%22280%22%20fill%3D%22%2334d399%22%20font-family%3D%22Inter%2Csans-serif%22%20font-size%3D%227%22%20text-anchor%3D%22middle%22%3ENVMe%201%3C%2Ftext%3E%0A%3Ctext%20x%3D%22173%22%20y%3D%22290%22%20fill%3D%22%2334d399%22%20font-family%3D%22Inter%2Csans-serif%22%20font-size%3D%227%22%20text-anchor%3D%22middle%22%3E1.6TB%20ESA%3C%2Ftext%3E%0A%3Crect%20x%3D%2245%22%20y%3D%22301%22%20width%3D%2280%22%20height%3D%2230%22%20rx%3D%223%22%20fill%3D%22%230f1a0c%22%2F%3E%0A%3Ctext%20x%3D%2285%22%20y%3D%22315%22%20fill%3D%22%2334d399%22%20font-family%3D%22Inter%2Csans-serif%22%20font-size%3D%227%22%20text-anchor%3D%22middle%22%3ENVMe%202%3C%2Ftext%3E%0A%3Ctext%20x%3D%2285%22%20y%3D%22325%22%20fill%3D%22%2334d399%22%20font-family%3D%22Inter%2Csans-serif%22%20font-size%3D%227%22%20text-anchor%3D%22middle%22%3E1.6TB%20ESA%3C%2Ftext%3E%0A%3Crect%20x%3D%22133%22%20y%3D%22301%22%20width%3D%2280%22%20height%3D%2230%22%20rx%3D%223%22%20fill%3D%22%230f1a0c%22%2F%3E%0A%3Ctext%20x%3D%22173%22%20y%3D%22315%22%20fill%3D%22%2334d399%22%20font-family%3D%22Inter%2Csans-serif%22%20font-size%3D%227%22%20text-anchor%3D%22middle%22%3ENVMe%203%3C%2Ftext%3E%0A%3Ctext%20x%3D%22173%22%20y%3D%22325%22%20fill%3D%22%2334d399%22%20font-family%3D%22Inter%2Csans-serif%22%20font-size%3D%227%22%20text-anchor%3D%22middle%22%3E1.6TB%20ESA%3C%2Ftext%3E%0A%3Ctext%20x%3D%22130%22%20y%3D%22358%22%20fill%3D%22%2394a3b8%22%20font-family%3D%22Inter%2Csans-serif%22%20font-size%3D%227.5%22%20text-anchor%3D%22middle%22%3Evmnic0%2Bvmnic1%20(25GbE%20LAG)%3C%2Ftext%3E%0A%3Ctext%20x%3D%22130%22%20y%3D%22368%22%20fill%3D%22%2364748b%22%20font-family%3D%22Inter%2Csans-serif%22%20font-size%3D%227%22%20text-anchor%3D%22middle%22%3EM.2%20Boot%20Disk%20(separate)%3C%2Ftext%3E%0A%0A%3C!--%20ESXi%20Host%202%20--%3E%0A%3Crect%20x%3D%22240%22%20y%3D%22182%22%20width%3D%22190%22%20height%3D%22192%22%20rx%3D%228%22%20fill%3D%22%230c1928%22%20stroke%3D%22%23fbbf24%22%20stroke-width%3D%221.5%22%2F%3E%0A%3Ctext%20x%3D%22335%22%20y%3D%22202%22%20fill%3D%22%23fbbf24%22%20font-family%3D%22Inter%2Csans-serif%22%20font-size%3D%229%22%20font-weight%3D%22700%22%20text-anchor%3D%22middle%22%3EESXi%20HOST%202%3C%2Ftext%3E%0A%3Ctext%20x%3D%22335%22%20y%3D%22215%22%20fill%3D%22%2364748b%22%20font-family%3D%22Inter%2Csans-serif%22%20font-size%3D%227%22%20text-anchor%3D%22middle%22%3E192.168.10.12%3C%2Ftext%3E%0A%3Crect%20x%3D%22250%22%20y%3D%22222%22%20width%3D%22170%22%20height%3D%2218%22%20rx%3D%223%22%20fill%3D%22%231a1505%22%2F%3E%0A%3Ctext%20x%3D%22335%22%20y%3D%22234%22%20fill%3D%22%23fbbf24%22%20font-family%3D%22Inter%2Csans-serif%22%20font-size%3D%227.5%22%20text-anchor%3D%22middle%22%3Evmk0%3A%20Mgmt%20%20vmk1%3A%20vMotion%3C%2Ftext%3E%0A%3Crect%20x%3D%22250%22%20y%3D%22244%22%20width%3D%22170%22%20height%3D%2218%22%20rx%3D%223%22%20fill%3D%22%231a1505%22%2F%3E%0A%3Ctext%20x%3D%22335%22%20y%3D%22256%22%20fill%3D%22%23fbbf24%22%20font-family%3D%22Inter%2Csans-serif%22%20font-size%3D%227.5%22%20text-anchor%3D%22middle%22%3Evmk2%3A%20vSAN%20%20vmk3%3A%20TEP%3C%2Ftext%3E%0A%3Crect%20x%3D%22250%22%20y%3D%22266%22%20width%3D%2280%22%20height%3D%2230%22%20rx%3D%223%22%20fill%3D%22%230f1a0c%22%2F%3E%0A%3Ctext%20x%3D%22290%22%20y%3D%22285%22%20fill%3D%22%2334d399%22%20font-family%3D%22Inter%2Csans-serif%22%20font-size%3D%227%22%20text-anchor%3D%22middle%22%3E4%C3%97%20NVMe%20ESA%3C%2Ftext%3E%0A%3Crect%20x%3D%22338%22%20y%3D%22266%22%20width%3D%2280%22%20height%3D%2230%22%20rx%3D%223%22%20fill%3D%22%230f1a0c%22%2F%3E%0A%3Ctext%20x%3D%22378%22%20y%3D%22285%22%20fill%3D%22%2334d399%22%20font-family%3D%22Inter%2Csans-serif%22%20font-size%3D%227%22%20text-anchor%3D%22middle%22%3E1.6TB%20each%3C%2Ftext%3E%0A%3Ctext%20x%3D%22335%22%20y%3D%22358%22%20fill%3D%22%2394a3b8%22%20font-family%3D%22Inter%2Csans-serif%22%20font-size%3D%227.5%22%20text-anchor%3D%22middle%22%3Evmnic0%2Bvmnic1%20(25GbE%20LAG)%3C%2Ftext%3E%0A%0A%3C!--%20ESXi%20Host%203%20--%3E%0A%3Crect%20x%3D%22445%22%20y%3D%22182%22%20width%3D%22190%22%20height%3D%22192%22%20rx%3D%228%22%20fill%3D%22%230c1928%22%20stroke%3D%22%23fbbf24%22%20stroke-width%3D%221.5%22%2F%3E%0A%3Ctext%20x%3D%22540%22%20y%3D%22202%22%20fill%3D%22%23fbbf24%22%20font-family%3D%22Inter%2Csans-serif%22%20font-size%3D%229%22%20font-weight%3D%22700%22%20text-anchor%3D%22middle%22%3EESXi%20HOST%203%3C%2Ftext%3E%0A%3Ctext%20x%3D%22540%22%20y%3D%22215%22%20fill%3D%22%2364748b%22%20font-family%3D%22Inter%2Csans-serif%22%20font-size%3D%227%22%20text-anchor%3D%22middle%22%3E192.168.10.13%3C%2Ftext%3E%0A%3Crect%20x%3D%22455%22%20y%3D%22222%22%20width%3D%22170%22%20height%3D%2218%22%20rx%3D%223%22%20fill%3D%22%231a1505%22%2F%3E%0A%3Ctext%20x%3D%22540%22%20y%3D%22234%22%20fill%3D%22%23fbbf24%22%20font-family%3D%22Inter%2Csans-serif%22%20font-size%3D%227.5%22%20text-anchor%3D%22middle%22%3Evmk0%3A%20Mgmt%20%20vmk1%3A%20vMotion%3C%2Ftext%3E%0A%3Crect%20x%3D%22455%22%20y%3D%22244%22%20width%3D%22170%22%20height%3D%2218%22%20rx%3D%223%22%20fill%3D%22%231a1505%22%2F%3E%0A%3Ctext%20x%3D%22540%22%20y%3D%22256%22%20fill%3D%22%23fbbf24%22%20font-family%3D%22Inter%2Csans-serif%22%20font-size%3D%227.5%22%20text-anchor%3D%22middle%22%3Evmk2%3A%20vSAN%20%20vmk3%3A%20TEP%3C%2Ftext%3E%0A%3Crect%20x%3D%22455%22%20y%3D%22266%22%20width%3D%2280%22%20height%3D%2230%22%20rx%3D%223%22%20fill%3D%22%230f1a0c%22%2F%3E%0A%3Ctext%20x%3D%22495%22%20y%3D%22285%22%20fill%3D%22%2334d399%22%20font-family%3D%22Inter%2Csans-serif%22%20font-size%3D%227%22%20text-anchor%3D%22middle%22%3E4%C3%97%20NVMe%20ESA%3C%2Ftext%3E%0A%3Crect%20x%3D%22543%22%20y%3D%22266%22%20width%3D%2280%22%20height%3D%2230%22%20rx%3D%223%22%20fill%3D%22%230f1a0c%22%2F%3E%0A%3Ctext%20x%3D%22583%22%20y%3D%22285%22%20fill%3D%22%2334d399%22%20font-family%3D%22Inter%2Csans-serif%22%20font-size%3D%227%22%20text-anchor%3D%22middle%22%3E1.6TB%20each%3C%2Ftext%3E%0A%3Ctext%20x%3D%22540%22%20y%3D%22358%22%20fill%3D%22%2394a3b8%22%20font-family%3D%22Inter%2Csans-serif%22%20font-size%3D%227.5%22%20text-anchor%3D%22middle%22%3Evmnic0%2Bvmnic1%20(25GbE%20LAG)%3C%2Ftext%3E%0A%0A%3C!--%20ESXi%20Host%204%20--%3E%0A%3Crect%20x%3D%22650%22%20y%3D%22182%22%20width%3D%22215%22%20height%3D%22192%22%20rx%3D%228%22%20fill%3D%22%230c1928%22%20stroke%3D%22%23fbbf24%22%20stroke-width%3D%221.5%22%2F%3E%0A%3Ctext%20x%3D%22757%22%20y%3D%22202%22%20fill%3D%22%23fbbf24%22%20font-family%3D%22Inter%2Csans-serif%22%20font-size%3D%229%22%20font-weight%3D%22700%22%20text-anchor%3D%22middle%22%3EESXi%20HOST%204%3C%2Ftext%3E%0A%3Ctext%20x%3D%22757%22%20y%3D%22215%22%20fill%3D%22%2364748b%22%20font-family%3D%22Inter%2Csans-serif%22%20font-size%3D%227%22%20text-anchor%3D%22middle%22%3E192.168.10.14%3C%2Ftext%3E%0A%3Crect%20x%3D%22660%22%20y%3D%22222%22%20width%3D%22195%22%20height%3D%2218%22%20rx%3D%223%22%20fill%3D%22%231a1505%22%2F%3E%0A%3Ctext%20x%3D%22757%22%20y%3D%22234%22%20fill%3D%22%23fbbf24%22%20font-family%3D%22Inter%2Csans-serif%22%20font-size%3D%227.5%22%20text-anchor%3D%22middle%22%3Evmk0%3A%20Mgmt%20%20vmk1%3A%20vMotion%3C%2Ftext%3E%0A%3Crect%20x%3D%22660%22%20y%3D%22244%22%20width%3D%22195%22%20height%3D%2218%22%20rx%3D%223%22%20fill%3D%22%231a1505%22%2F%3E%0A%3Ctext%20x%3D%22757%22%20y%3D%22256%22%20fill%3D%22%23fbbf24%22%20font-family%3D%22Inter%2Csans-serif%22%20font-size%3D%227.5%22%20text-anchor%3D%22middle%22%3Evmk2%3A%20vSAN%20%20vmk3%3A%20TEP%3C%2Ftext%3E%0A%3Crect%20x%3D%22660%22%20y%3D%22266%22%20width%3D%2280%22%20height%3D%2230%22%20rx%3D%223%22%20fill%3D%22%230f1a0c%22%2F%3E%0A%3Ctext%20x%3D%22700%22%20y%3D%22285%22%20fill%3D%22%2334d399%22%20font-family%3D%22Inter%2Csans-serif%22%20font-size%3D%227%22%20text-anchor%3D%22middle%22%3E4%C3%97%20NVMe%20ESA%3C%2Ftext%3E%0A%3Crect%20x%3D%22748%22%20y%3D%22266%22%20width%3D%22103%22%20height%3D%2230%22%20rx%3D%223%22%20fill%3D%22%230f1a0c%22%2F%3E%0A%3Ctext%20x%3D%22800%22%20y%3D%22285%22%20fill%3D%22%2334d399%22%20font-family%3D%22Inter%2Csans-serif%22%20font-size%3D%227%22%20text-anchor%3D%22middle%22%3EvSAN%20ESA%20Pool%3C%2Ftext%3E%0A%3Ctext%20x%3D%22757%22%20y%3D%22358%22%20fill%3D%22%2394a3b8%22%20font-family%3D%22Inter%2Csans-serif%22%20font-size%3D%227.5%22%20text-anchor%3D%22middle%22%3Evmnic0%2Bvmnic1%20(25GbE%20LAG)%3C%2Ftext%3E%0A%0A%3C!--%20vSAN%20ESA%20label%20across%20hosts%20--%3E%0A%3Ctext%20x%3D%22450%22%20y%3D%22380%22%20fill%3D%22%2334d399%22%20font-family%3D%22Inter%2Csans-serif%22%20font-size%3D%229%22%20font-weight%3D%22700%22%20text-anchor%3D%22middle%22%3EvSAN%20ESA%20DATASTORE%20%E2%80%94%20NVMe%20Only%20(no%20SAS%2FSATA)%20%E2%80%94%20FTT%3D1%20RAID-5%20or%20RAID-1%3C%2Ftext%3E%0A%0A%3C!--%20WORKLOAD%20DOMAINS%20--%3E%0A%3Crect%20x%3D%2220%22%20y%3D%22404%22%20width%3D%22860%22%20height%3D%2296%22%20rx%3D%2210%22%20fill%3D%22%23080f20%22%20stroke%3D%22%2306b6d4%22%20stroke-width%3D%221%22%20stroke-dasharray%3D%224%2C3%22%2F%3E%0A%3Ctext%20x%3D%22450%22%20y%3D%22423%22%20fill%3D%22%2306b6d4%22%20font-family%3D%22Inter%2Csans-serif%22%20font-size%3D%2210%22%20font-weight%3D%22700%22%20text-anchor%3D%22middle%22%20letter-spacing%3D%222%22%3EWORKLOAD%20DOMAINS%20(post-bringup)%3C%2Ftext%3E%0A%3Crect%20x%3D%2235%22%20y%3D%22432%22%20width%3D%22195%22%20height%3D%2252%22%20rx%3D%226%22%20fill%3D%22%230c1928%22%20stroke%3D%22%2360a5fa%22%20stroke-width%3D%221%22%2F%3E%0A%3Ctext%20x%3D%22132%22%20y%3D%22452%22%20fill%3D%22%2360a5fa%22%20font-family%3D%22Inter%2Csans-serif%22%20font-size%3D%229%22%20font-weight%3D%22700%22%20text-anchor%3D%22middle%22%3EVI%20Workload%20Domain%3C%2Ftext%3E%0A%3Ctext%20x%3D%22132%22%20y%3D%22467%22%20fill%3D%22%2364748b%22%20font-family%3D%22Inter%2Csans-serif%22%20font-size%3D%227.5%22%20text-anchor%3D%22middle%22%3E3%2B%20ESXi%20%2B%20vSAN%20ESA%20%2B%20NSX-T%3C%2Ftext%3E%0A%3Crect%20x%3D%22243%22%20y%3D%22432%22%20width%3D%22195%22%20height%3D%2252%22%20rx%3D%226%22%20fill%3D%22%230c1928%22%20stroke%3D%22%2334d399%22%20stroke-width%3D%221%22%2F%3E%0A%3Ctext%20x%3D%22340%22%20y%3D%22452%22%20fill%3D%22%2334d399%22%20font-family%3D%22Inter%2Csans-serif%22%20font-size%3D%229%22%20font-weight%3D%22700%22%20text-anchor%3D%22middle%22%3EVCF%2B%20Stretched%20Cluster%3C%2Ftext%3E%0A%3Ctext%20x%3D%22340%22%20y%3D%22467%22%20fill%3D%22%2364748b%22%20font-family%3D%22Inter%2Csans-serif%22%20font-size%3D%227.5%22%20text-anchor%3D%22middle%22%3EDual-site%20vSAN%20FTT%3D1%3C%2Ftext%3E%0A%3Crect%20x%3D%22452%22%20y%3D%22432%22%20width%3D%22195%22%20height%3D%2252%22%20rx%3D%226%22%20fill%3D%22%230c1928%22%20stroke%3D%22%23a78bfa%22%20stroke-width%3D%221%22%2F%3E%0A%3Ctext%20x%3D%22549%22%20y%3D%22452%22%20fill%3D%22%23a78bfa%22%20font-family%3D%22Inter%2Csans-serif%22%20font-size%3D%229%22%20font-weight%3D%22700%22%20text-anchor%3D%22middle%22%3ETanzu%20Workload%20Domain%3C%2Ftext%3E%0A%3Ctext%20x%3D%22549%22%20y%3D%22467%22%20fill%3D%22%2364748b%22%20font-family%3D%22Inter%2Csans-serif%22%20font-size%3D%227.5%22%20text-anchor%3D%22middle%22%3ETKGs%20Supervisor%20Cluster%3C%2Ftext%3E%0A%3Crect%20x%3D%22660%22%20y%3D%22432%22%20width%3D%22205%22%20height%3D%2252%22%20rx%3D%226%22%20fill%3D%22%230c1928%22%20stroke%3D%22%23fb923c%22%20stroke-width%3D%221%22%2F%3E%0A%3Ctext%20x%3D%22762%22%20y%3D%22452%22%20fill%3D%22%23fb923c%22%20font-family%3D%22Inter%2Csans-serif%22%20font-size%3D%229%22%20font-weight%3D%22700%22%20text-anchor%3D%22middle%22%3EExpansion%20%2F%20Custom%3C%2Ftext%3E%0A%3Ctext%20x%3D%22762%22%20y%3D%22467%22%20fill%3D%22%2364748b%22%20font-family%3D%22Inter%2Csans-serif%22%20font-size%3D%227.5%22%20text-anchor%3D%22middle%22%3EAdd%20hosts%20via%20SDDC%20Manager%3C%2Ftext%3E%0A%0A%3C!--%20NETWORK%20LAYER%20--%3E%0A%3Crect%20x%3D%2220%22%20y%3D%22512%22%20width%3D%22860%22%20height%3D%22112%22%20rx%3D%2210%22%20fill%3D%22%23080f20%22%20stroke%3D%22%23a78bfa%22%20stroke-width%3D%221%22%20stroke-dasharray%3D%224%2C3%22%2F%3E%0A%3Ctext%20x%3D%22450%22%20y%3D%22532%22%20fill%3D%22%23a78bfa%22%20font-family%3D%22Inter%2Csans-serif%22%20font-size%3D%2210%22%20font-weight%3D%22700%22%20text-anchor%3D%22middle%22%20letter-spacing%3D%222%22%3ENSX-T%20NETWORK%20TOPOLOGY%3C%2Ftext%3E%0A%3Crect%20x%3D%2235%22%20y%3D%22541%22%20width%3D%22130%22%20height%3D%2272%22%20rx%3D%226%22%20fill%3D%22%230f1028%22%20stroke%3D%22%23a78bfa%22%20stroke-width%3D%221%22%2F%3E%0A%3Ctext%20x%3D%22100%22%20y%3D%22562%22%20fill%3D%22%23a78bfa%22%20font-family%3D%22Inter%2Csans-serif%22%20font-size%3D%228%22%20font-weight%3D%22700%22%20text-anchor%3D%22middle%22%3ETier-0%20Gateway%3C%2Ftext%3E%0A%3Ctext%20x%3D%22100%22%20y%3D%22576%22%20fill%3D%22%2364748b%22%20font-family%3D%22Inter%2Csans-serif%22%20font-size%3D%227%22%20text-anchor%3D%22middle%22%3EBGP%20to%20Physical%3C%2Ftext%3E%0A%3Ctext%20x%3D%22100%22%20y%3D%22589%22%20fill%3D%22%2364748b%22%20font-family%3D%22Inter%2Csans-serif%22%20font-size%3D%227%22%20text-anchor%3D%22middle%22%3EHA%20Active%2FActive%3C%2Ftext%3E%0A%3Crect%20x%3D%22180%22%20y%3D%22541%22%20width%3D%22130%22%20height%3D%2272%22%20rx%3D%226%22%20fill%3D%22%230f1028%22%20stroke%3D%22%23a78bfa%22%20stroke-width%3D%221%22%2F%3E%0A%3Ctext%20x%3D%22245%22%20y%3D%22562%22%20fill%3D%22%23a78bfa%22%20font-family%3D%22Inter%2Csans-serif%22%20font-size%3D%228%22%20font-weight%3D%22700%22%20text-anchor%3D%22middle%22%3ETier-1%20Gateway%3C%2Ftext%3E%0A%3Ctext%20x%3D%22245%22%20y%3D%22576%22%20fill%3D%22%2364748b%22%20font-family%3D%22Inter%2Csans-serif%22%20font-size%3D%227%22%20text-anchor%3D%22middle%22%3EPer%20Workload%20Domain%3C%2Ftext%3E%0A%3Ctext%20x%3D%22245%22%20y%3D%22589%22%20fill%3D%22%2364748b%22%20font-family%3D%22Inter%2Csans-serif%22%20font-size%3D%227%22%20text-anchor%3D%22middle%22%3ENAT%20%2F%20Load%20Balancer%3C%2Ftext%3E%0A%3Crect%20x%3D%22325%22%20y%3D%22541%22%20width%3D%22130%22%20height%3D%2272%22%20rx%3D%226%22%20fill%3D%22%230f1028%22%20stroke%3D%22%23a78bfa%22%20stroke-width%3D%221%22%2F%3E%0A%3Ctext%20x%3D%22390%22%20y%3D%22562%22%20fill%3D%22%23a78bfa%22%20font-family%3D%22Inter%2Csans-serif%22%20font-size%3D%228%22%20font-weight%3D%22700%22%20text-anchor%3D%22middle%22%3EOverlay%20Segments%3C%2Ftext%3E%0A%3Ctext%20x%3D%22390%22%20y%3D%22576%22%20fill%3D%22%2364748b%22%20font-family%3D%22Inter%2Csans-serif%22%20font-size%3D%227%22%20text-anchor%3D%22middle%22%3EGENEVE%20Encapsulation%3C%2Ftext%3E%0A%3Ctext%20x%3D%22390%22%20y%3D%22589%22%20fill%3D%22%2364748b%22%20font-family%3D%22Inter%2Csans-serif%22%20font-size%3D%227%22%20text-anchor%3D%22middle%22%3EVXLAN%20TEP%20(MTU%209000)%3C%2Ftext%3E%0A%3Crect%20x%3D%22470%22%20y%3D%22541%22%20width%3D%22130%22%20height%3D%2272%22%20rx%3D%226%22%20fill%3D%22%230f1028%22%20stroke%3D%22%23a78bfa%22%20stroke-width%3D%221%22%2F%3E%0A%3Ctext%20x%3D%22535%22%20y%3D%22562%22%20fill%3D%22%23a78bfa%22%20font-family%3D%22Inter%2Csans-serif%22%20font-size%3D%228%22%20font-weight%3D%22700%22%20text-anchor%3D%22middle%22%3EDistributed%20Firewall%3C%2Ftext%3E%0A%3Ctext%20x%3D%22535%22%20y%3D%22576%22%20fill%3D%22%2364748b%22%20font-family%3D%22Inter%2Csans-serif%22%20font-size%3D%227%22%20text-anchor%3D%22middle%22%3EEast-West%20Micro-seg%3C%2Ftext%3E%0A%3Ctext%20x%3D%22535%22%20y%3D%22589%22%20fill%3D%22%2364748b%22%20font-family%3D%22Inter%2Csans-serif%22%20font-size%3D%227%22%20text-anchor%3D%22middle%22%3EPer-vNIC%20enforcement%3C%2Ftext%3E%0A%3Crect%20x%3D%22615%22%20y%3D%22541%22%20width%3D%22130%22%20height%3D%2272%22%20rx%3D%226%22%20fill%3D%22%230f1028%22%20stroke%3D%22%23a78bfa%22%20stroke-width%3D%221%22%2F%3E%0A%3Ctext%20x%3D%22680%22%20y%3D%22562%22%20fill%3D%22%23a78bfa%22%20font-family%3D%22Inter%2Csans-serif%22%20font-size%3D%228%22%20font-weight%3D%22700%22%20text-anchor%3D%22middle%22%3EEdge%20Cluster%3C%2Ftext%3E%0A%3Ctext%20x%3D%22680%22%20y%3D%22576%22%20fill%3D%22%2364748b%22%20font-family%3D%22Inter%2Csans-serif%22%20font-size%3D%227%22%20text-anchor%3D%22middle%22%3E2%C3%97%20Edge%20VM%20(Bare%20Metal)%3C%2Ftext%3E%0A%3Ctext%20x%3D%22680%22%20y%3D%22589%22%20fill%3D%22%2364748b%22%20font-family%3D%22Inter%2Csans-serif%22%20font-size%3D%227%22%20text-anchor%3D%22middle%22%3EN-S%20Traffic%20%26amp%3B%20NAT%3C%2Ftext%3E%0A%3Crect%20x%3D%22760%22%20y%3D%22541%22%20width%3D%22105%22%20height%3D%2272%22%20rx%3D%226%22%20fill%3D%22%230f1028%22%20stroke%3D%22%23a78bfa%22%20stroke-width%3D%221%22%2F%3E%0A%3Ctext%20x%3D%22812%22%20y%3D%22562%22%20fill%3D%22%23a78bfa%22%20font-family%3D%22Inter%2Csans-serif%22%20font-size%3D%228%22%20font-weight%3D%22700%22%20text-anchor%3D%22middle%22%3ETransport%20Zones%3C%2Ftext%3E%0A%3Ctext%20x%3D%22812%22%20y%3D%22576%22%20fill%3D%22%2364748b%22%20font-family%3D%22Inter%2Csans-serif%22%20font-size%3D%227%22%20text-anchor%3D%22middle%22%3EOverlay%20%2B%20VLAN%3C%2Ftext%3E%0A%3Ctext%20x%3D%22812%22%20y%3D%22589%22%20fill%3D%22%2364748b%22%20font-family%3D%22Inter%2Csans-serif%22%20font-size%3D%227%22%20text-anchor%3D%22middle%22%3EHost%20Transport%20Nodes%3C%2Ftext%3E%0A%3C%2Fsvg%3E)
Hardware Requirements
vSAN ESA Storage — NVMe Only
This is the most critical hardware constraint in VCF 9.1. vSAN ESA eliminates the OSA cache/capacity tier separation entirely. All NVMe drives contribute to a single pooled capacity layer. SAS SSDs are not supported in ESA mode. SATA SSDs are not supported in ESA mode. The only supported disk type is NVMe (PCIe 4.0 or 5.0 preferred for performance). Required minimums per host: 4× NVMe drives, each ≥ 1.6 TB, on the VMware vSAN HCL. Drives must be HCL-listed — generic NVMe drives that are not on the HCL will cause ESA claiming to fail silently.
# Verify NVMe drives are visible and unclaimed on each host
esxcli storage core device list | grep -i nvme

# Check if drives are on the vSAN HCL (output shows HCL status)
esxcli vsan storage list

# Verify no existing partitions (must be clean for ESA claiming)
esxcli storage core device partition list -d <naa.device-id>

# Wipe a disk if it has stale partitions
esxcli storage core device partition deleteAll -d <naa.device-id>

# Confirm ESA eligibility
python /usr/lib/vmware/vsan/bin/vsan-esa-eligibility.py
Compute and Memory
Management domain hosts must be sized to run the management VMs (vCenter, NSX Managers ×3, SDDC Manager, and optionally Aria components) as well as serve as ESXi hypervisors. Minimum per host for a production management domain: 2× Intel Xeon Scalable Gen 4 (Sapphire Rapids) or AMD EPYC Gen 4 (Genoa), ≥ 16 physical cores each; 512 GB RAM (768 GB recommended if running Aria); a dedicated M.2 or SD card boot device (NOT one of the vSAN NVMe drives). Hyper-threading must be enabled. Hardware virtualization (VT-x / AMD-V) and IOMMU must be enabled in BIOS.
Networking Requirements
Each host requires a minimum of 2× 25 GbE NICs (or 2× 10 GbE for lab, though 25 GbE is required for production vSAN ESA throughput). These are bonded into a LAG (LACP or Static) on the DVS. Four VLANs are required: Management VLAN (routed, MTU 1500); vMotion VLAN (routed, MTU 9000); vSAN VLAN (routed, MTU 9000, critical — vSAN ESA uses RDMA and is latency-sensitive); NSX TEP VLAN (routed between hosts, MTU 9000, used for GENEVE overlay tunnels). Upstream switch ports must be configured as trunk ports carrying all four VLANs. QoS marking for vSAN traffic (DSCP EF) is strongly recommended.
DNS and NTP Planning
Cloud Builder’s pre-validation checks ~200 conditions, and the majority of bringup failures come from DNS. Every component needs both a forward (A) record and a reverse (PTR) record. Plan and create all DNS records before deploying Cloud Builder. Here is the full required DNS record set for a 4-host management domain:
# ── Forward A records (add to your DNS zone vcf.lab) ──────────────────────
cloudbuilder.vcf.lab       →  192.168.10.10
sddc-mgr.vcf.lab           →  192.168.10.20
vcenter-mgmt.vcf.lab       →  192.168.10.21
nsx-mgr-01.vcf.lab         →  192.168.10.31
nsx-mgr-02.vcf.lab         →  192.168.10.32
nsx-mgr-03.vcf.lab         →  192.168.10.33
nsx-vip.vcf.lab            →  192.168.10.34   # NSX cluster VIP
esxi-mgmt-01.vcf.lab       →  192.168.10.11
esxi-mgmt-02.vcf.lab       →  192.168.10.12
esxi-mgmt-03.vcf.lab       →  192.168.10.13
esxi-mgmt-04.vcf.lab       →  192.168.10.14

# ── Reverse PTR records (in 10.168.192.in-addr.arpa zone) ─────────────────
10  →  cloudbuilder.vcf.lab
20  →  sddc-mgr.vcf.lab
21  →  vcenter-mgmt.vcf.lab
31  →  nsx-mgr-01.vcf.lab
32  →  nsx-mgr-02.vcf.lab
33  →  nsx-mgr-03.vcf.lab
34  →  nsx-vip.vcf.lab
11  →  esxi-mgmt-01.vcf.lab
12  →  esxi-mgmt-02.vcf.lab
13  →  esxi-mgmt-03.vcf.lab
14  →  esxi-mgmt-04.vcf.lab

# ── Validate from Cloud Builder before bringup ────────────────────────────
for host in cloudbuilder sddc-mgr vcenter-mgmt nsx-mgr-01 nsx-mgr-02 nsx-mgr-03 nsx-vip esxi-mgmt-0{1,2,3,4}; do
  echo -n "$host → "; nslookup $host.vcf.lab | grep Address | tail -1
done
Step 1 — Prepare ESXi Hosts
Install ESXi 9.1 on each host from the Broadcom-signed ISO. During install, select a dedicated boot device (M.2 NVMe ≥ 128 GB or SD card) — never a drive that will be used for vSAN. After first boot, configure the management VMkernel, hostname, DNS, and NTP on each host before Cloud Builder can reach them.
# Run on EACH host after ESXi 9.1 install
# ── Management network ─────────────────────────────────────────────────────
esxcli network ip interface ipv4 set -i vmk0   -I 192.168.10.11 -N 255.255.255.0 -G 192.168.10.1 -t static

# ── Hostname ───────────────────────────────────────────────────────────────
esxcli system hostname set --fqdn=esxi-mgmt-01.vcf.lab

# ── DNS ───────────────────────────────────────────────────────────────────
esxcli network ip dns server add --server=192.168.10.5
esxcli network ip dns server add --server=192.168.10.6
esxcli network ip dns search domain add --domain=vcf.lab

# ── NTP ──────────────────────────────────────────────────────────────────
esxcli system ntp set --server=ntp.vcf.lab
esxcli system ntp set --enabled=true
esxcli system ntp get   # verify Synchronized: true

# ── Enable SSH for Cloud Builder access ───────────────────────────────────
vim-cmd hostsvc/enable_ssh
vim-cmd hostsvc/start_ssh

# ── Verify MTU on vmnic0/vmnic1 ──────────────────────────────────────────
esxcli network nic get -n vmnic0 | grep MTU
# Must show 9000 if your switch is configured for jumbo frames on vSAN VLAN
Step 2 — Deploy Cloud Builder 9.1
Deploy the Cloud Builder 9.1 OVA on any temporary ESXi host that has routed connectivity to the management VLAN. This host does not need to be one of the VCF management hosts — it can be a standalone lab host or even a nested ESXi. Cloud Builder VM requirements: 4 vCPU, 12 GB RAM, 200 GB thin disk. During OVA deployment configure the static management IP, default gateway, DNS, NTP, and the initial admin password. After power-on, wait 3–5 minutes for all services to initialise, then access the UI at https://<cloudbuilder-ip> with credentials admin / <password-set-at-deploy>.
# Verify Cloud Builder is fully up (all services green)
curl -k -s https://192.168.10.10/v1/system/status | python3 -m json.tool
# Expected: "status": "ACTIVE"

# Check supported VCF version
curl -k -s https://192.168.10.10/v1/system/version | python3 -m json.tool
# Expected: "version": "9.1.x.x-build"
Step 3 — Build the Bringup JSON Specification
The bringup JSON is the single most important file in a VCF deployment. Every field must be correct. Download the sample JSON template from Cloud Builder UI → Management Domain → Download Deployment Parameter Workbook. The full schema has 15+ top-level sections — the critical ones are shown below with production-ready values and inline comments explaining each decision point.
{
  "managementPoolName": "vcf-mgmt-pool",
  "sddcId": "vcf-mgmt-01",

  "ceipEnabled": false,

  "esxLicense": "XXXXX-XXXXX-XXXXX-XXXXX-XXXXX",
  "vsanLicense": "XXXXX-XXXXX-XXXXX-XXXXX-XXXXX",
  "nsxTLicense": "XXXXX-XXXXX-XXXXX-XXXXX-XXXXX",
  "vcenterLicense": "XXXXX-XXXXX-XXXXX-XXXXX-XXXXX",

  "ntpServers": ["192.168.10.1", "192.168.10.2"],

  "dnsSpec": {
    "subdomain": "vcf.lab",
    "domain": "vcf.lab",
    "nameserver": "192.168.10.5",
    "secondaryNameserver": "192.168.10.6"
  },

  "networkSpecs": [
    {
      "subnet": "192.168.10.0/24", "vlanId": "10",
      "mtu": 1500, "type": "MANAGEMENT",
      "gateway": "192.168.10.1",
      "portGroupKey": "SDDC-DPortGroup-Mgmt"
    },
    {
      "subnet": "192.168.20.0/24", "vlanId": "20",
      "mtu": 9000, "type": "VSAN",           // Must be 9000 for ESA
      "gateway": "192.168.20.1",
      "portGroupKey": "SDDC-DPortGroup-VSAN"
    },
    {
      "subnet": "192.168.30.0/24", "vlanId": "30",
      "mtu": 9000, "type": "VMOTION",
      "gateway": "192.168.30.1",
      "portGroupKey": "SDDC-DPortGroup-vMotion"
    },
    {
      "subnet": "192.168.40.0/24", "vlanId": "40",
      "mtu": 9000, "type": "NSX_VTEP",       // TEP pool below
      "gateway": "192.168.40.1",
      "portGroupKey": "SDDC-DPortGroup-TEP"
    }
  ],

  "nsxtSpec": {
    "nsxtManagerSize": "medium",             // medium = 4vCPU/16GB
    "nsxtManagers": [
      {"hostname": "nsx-mgr-01.vcf.lab", "ip": "192.168.10.31"},
      {"hostname": "nsx-mgr-02.vcf.lab", "ip": "192.168.10.32"},
      {"hostname": "nsx-mgr-03.vcf.lab", "ip": "192.168.10.33"}
    ],
    "rootNsxtManagerPassword": "VMware1!VMware1!",
    "nsxtAdminPassword": "VMware1!VMware1!",
    "nsxtAuditPassword": "VMware1!VMware1!",
    "vip": "192.168.10.34",
    "vipFqdn": "nsx-vip.vcf.lab",
    "transportVlanId": 40,
    "ipAddressPoolSpec": {
      "name": "tep-pool-mgmt",
      "subnets": [{
        "ipAddressPoolRanges": [
          {"start": "192.168.40.11", "end": "192.168.40.30"}
        ],
        "cidr": "192.168.40.0/24",
        "gateway": "192.168.40.1"
      }]
    }
  },

  "vsanSpec": {
    "datastoreName": "SDDC-M01-vSAN-ESA",
    "esaConfig": {"enabled": true},           // ESA mode
    "vsanDeduplicationAndCompressionConfig": "ENABLED",
    "failures_to_tolerate": 1                 // FTT=1, RAID-5 with 4+ hosts
  },

  "dvsSpecs": [{
    "mtu": 9000,
    "vmnics": ["vmnic0", "vmnic1"],
    "dvsName": "SDDC-Dswitch-Private",
    "vcenterId": "vcenter-mgmt",
    "niocSpecs": [
      {"trafficType": "VSAN",     "value": "HIGH"},
      {"trafficType": "VMOTION",  "value": "LOW"},
      {"trafficType": "MANAGEMENT","value": "NORMAL"}
    ]
  }],

  "vcenterSpec": {
    "vcenterIp": "192.168.10.21",
    "vcenterHostname": "vcenter-mgmt.vcf.lab",
    "licenseFile": "XXXXX-XXXXX-XXXXX-XXXXX-XXXXX",
    "vmSize": "small",                        // small=8vCPU/24GB for lab
    "storageSize": "lstorage",
    "rootVcenterPassword": "VMware1!VMware1!"
  },

  "esxiSpecs": [
    {
      "hostname": "esxi-mgmt-01.vcf.lab", "ip": "192.168.10.11",
      "username": "root", "password": "VMware1!",
      "vmnics": ["vmnic0","vmnic1"],
      "vsanSpec": {"vsanCacheDisks": [], "vsanCapacityDisks": []}
    },
    {"hostname": "esxi-mgmt-02.vcf.lab", "ip": "192.168.10.12",
     "username": "root", "password": "VMware1!", "vmnics": ["vmnic0","vmnic1"]},
    {"hostname": "esxi-mgmt-03.vcf.lab", "ip": "192.168.10.13",
     "username": "root", "password": "VMware1!", "vmnics": ["vmnic0","vmnic1"]},
    {"hostname": "esxi-mgmt-04.vcf.lab", "ip": "192.168.10.14",
     "username": "root", "password": "VMware1!", "vmnics": ["vmnic0","vmnic1"]}
  ],

  "sddcManagerSpec": {
    "hostname": "sddc-mgr.vcf.lab",
    "ipAddress": "192.168.10.20",
    "localUserPassword": "VMware1!VMware1!",
    "rootUserPassword": "VMware1!VMware1!",
    "secondUserPassword": "VMware1!VMware1!"
  }
}
Step 4 — Pre-Validation and Bringup
In Cloud Builder UI, go to Management Domain → Bring Up → Upload JSON. Click Validate. All ~200 checks must pass — fix any failures before proceeding. The most common failures at this stage: PTR records missing for one or more components; NTP not synchronised on hosts (confirm with esxcli system ntp get); password complexity mismatch (VCF 9.1 requires ≥ 15 chars, at least 1 uppercase, 1 digit, 1 special char); NVMe disks with stale partition tables. Once all checks are green, click Deploy.
The automated bringup sequence takes 90–120 minutes and performs these phases in order: Phase 1 — DVS creation and vmkernel migration on all hosts; Phase 2 — vSAN ESA disk claiming and datastore creation; Phase 3 — vCenter Server 9.1 deployment and cluster formation; Phase 4 — NSX-T 3-node manager cluster deployment; Phase 5 — NSX-T transport zone, host transport node and edge cluster configuration; Phase 6 — SDDC Manager deployment; Phase 7 — Component registration and inventory population in SDDC Manager.
# Monitor bringup progress via Cloud Builder API
watch -n 30 'curl -k -s -u admin:VMware1!   https://192.168.10.10/v1/sddcs | python3 -m json.tool | grep -E "status|phase|percent"'

# Stream bringup log in real time
ssh admin@192.168.10.10 "tail -f /var/log/vmware/vcf/cloudbuilder/vcf-bringup.log"
Step 5 — Post-Bringup Validation
When Cloud Builder shows COMPLETED_WITH_SUCCESS, run the following validation sequence before declaring the management domain healthy. Each check targets a different component layer.
# ── vSAN ESA health ─────────────────────────────────────────────────────
# From any host in the management cluster:
esxcli vsan health cluster list
# Every item must show: Status: green

# Verify ESA pool details
esxcli vsan storage list | grep -E "Is SSD|Type|NVMe"
# All disks should show: Is SSD: true, Type: DIRECT

# ── NSX-T validation ────────────────────────────────────────────────────
# Confirm all transport nodes prepared (from NSX Manager):
curl -k -u admin:VMware1!VMware1!   https://nsx-vip.vcf.lab/api/v1/transport-nodes/status |   python3 -m json.tool | grep -E "status|display_name"
# All hosts: "status": "UP"

# Verify TEP ping between hosts (GENEVE overlay)
ping ++netstack=vxlan -I vmk3 -d -s 8972 -c 5 192.168.40.12
# Packet loss must be 0%

# ── SDDC Manager component health ────────────────────────────────────────
curl -k -u admin@local:VMware1!VMware1!   https://sddc-mgr.vcf.lab/v1/system/healthsummary |   python3 -m json.tool | grep -E "status|component"

# ── vCenter cluster health ───────────────────────────────────────────────
# Log into vCenter UI → Cluster → Monitor → vSAN → Health
# All checks green; capacity should show 4× NVMe pooled
Step 6 — NSX-T Tier-0 and Tier-1 Configuration
After bringup, the NSX-T logical fabric (transport zones, host transport nodes) is configured, but the Tier-0 gateway still requires upstream BGP peering to make overlay segments routable externally. Log into NSX Manager at https://nsx-vip.vcf.lab with admin credentials.
# ── Create Tier-0 via NSX API ────────────────────────────────────────────
curl -k -u admin:VMware1!VMware1!   https://nsx-vip.vcf.lab/policy/api/v1/infra/tier-0s/T0-VCF-Mgmt   -X PUT -H 'Content-Type: application/json' -d '{
    "display_name": "T0-VCF-Mgmt",
    "ha_mode": "ACTIVE_ACTIVE",
    "failover_mode": "NON_PREEMPTIVE"
  }'

# ── Configure BGP on T0 ──────────────────────────────────────────────────
curl -k -u admin:VMware1!VMware1!   https://nsx-vip.vcf.lab/policy/api/v1/infra/tier-0s/T0-VCF-Mgmt/locale-services/T0-LS   -X PUT -H 'Content-Type: application/json' -d '{
    "edge_cluster_path": "/infra/sites/default/enforcement-points/default/edge-clusters/edge-cluster-01",
    "bgp": {
      "local_as_num": "65000",
      "inter_sr_ibgp": true,
      "neighbors": [{
        "display_name": "upstream-router-01",
        "neighbor_address": "192.168.10.254",
        "remote_as_num": "65100",
        "source_addresses": ["192.168.10.31"]
      }]
    }
  }'

# ── Verify BGP session established ───────────────────────────────────────
curl -k -u admin:VMware1!VMware1!   "https://nsx-vip.vcf.lab/api/v1/logical-routers/{T0-ID}/routing/bgp/neighbors/status" |   python3 -m json.tool | grep -E "connection_state|neighbor_address"
# Expected: "connection_state": "ESTABLISHED"
Step 7 — Deploy Your First Workload Domain
Log into SDDC Manager at https://sddc-mgr.vcf.lab. Navigate to Inventory → Workload Domains → Add Workload Domain. You need at least 3 additional ESXi hosts pre-configured identically to the management hosts (same NVMe requirement, same VLAN trunk, DNS/NTP set). Commission these hosts first via SDDC Manager → Inventory → Hosts → Commission Hosts. The commission process validates each host before it becomes available for workload domain assignment.
# Commission hosts via SDDC Manager API before workload domain creation
curl -k -u admin@local:VMware1!VMware1!   https://sddc-mgr.vcf.lab/v1/hosts   -X POST -H 'Content-Type: application/json' -d '{
    "fqdn": "esxi-wld-01.vcf.lab",
    "username": "root",
    "password": "VMware1!",
    "storageType": "VSAN"
  }'

# Poll commission status
curl -k -u admin@local:VMware1!VMware1!   https://sddc-mgr.vcf.lab/v1/tasks/{task-id} |   python3 -m json.tool | grep -E "status|name"

# Create VI Workload Domain (simplified payload)
curl -k -u admin@local:VMware1!VMware1!   https://sddc-mgr.vcf.lab/v1/domains   -X POST -H 'Content-Type: application/json' -d '{
    "domainName": "wld-domain-01",
    "orgName": "VCF-Lab",
    "vcenterSpec": {
      "name": "vcenter-wld.vcf.lab",
      "networkDetailsSpec": {"ipAddress": "192.168.10.22", "dnsName": "vcenter-wld.vcf.lab",
        "gateway": "192.168.10.1", "subnetMask": "255.255.255.0"}
    },
    "computeSpec": {
      "clusterSpecs": [{
        "name": "wld-cluster-01",
        "hostSpecs": [
          {"id": "host-wld-01-uuid", "licenseKey": "XXXXX-XXXXX-XXXXX-XXXXX-XXXXX"},
          {"id": "host-wld-02-uuid", "licenseKey": "XXXXX-XXXXX-XXXXX-XXXXX-XXXXX"},
          {"id": "host-wld-03-uuid", "licenseKey": "XXXXX-XXXXX-XXXXX-XXXXX-XXXXX"}
        ],
        "datastoreSpec": {
          "vsanDatastoreSpec": {
            "failuresToTolerate": 1,
            "esaConfig": {"enabled": true}
          }
        }
      }]
    }
  }'
Step 8 — Certificate Management
VCF 9.1 ships with SDDC Manager acting as an intermediate CA for all component certificates. In production, you should replace the self-signed SDDC Manager CA with your enterprise CA chain. Navigate to SDDC Manager → Security → Certificate Authority and upload your enterprise CA root and intermediate certificates. Once the CA is configured, use Security → Certificates to issue and install certificates for vCenter, NSX Managers, and SDDC Manager in a single operation — VCF handles the CSR generation, signing, and installation automatically.
# Configure Microsoft CA integration (example)
curl -k -u admin@local:VMware1!VMware1!   https://sddc-mgr.vcf.lab/v1/certificate-authorities   -X PUT -H 'Content-Type: application/json' -d '{
    "caType": "Microsoft",
    "serverUrl": "https://ca.corp.local/certsrv",
    "username": "corp\vcf-svc",
    "password": "ServiceAcct1!",
    "templateName": "VMware"
  }'

# Trigger certificate rotation for all components in a domain
curl -k -u admin@local:VMware1!VMware1!   https://sddc-mgr.vcf.lab/v1/domains/{domain-id}/certificates   -X PATCH -H 'Content-Type: application/json' -d '{
    "operationType": "REPLACE_WITH_CA_SIGNED"
  }'
Common Issues and Fixes
ESA Disk Claiming Fails
The most common cause is using drives not on the VMware vSAN HCL, or drives still having old partition signatures. Second most common cause: the drive is a SAS or SATA SSD — these are simply not compatible with ESA. Verify with esxcli storage core device list | grep -E "Display Name|Is SSD|Device Type". The device type must show ATA for NVMe in ESXi’s reporting (confusingly), but the transport protocol must be PCIe/NVMe. Check the HCL at vmware.com/compatibility using the exact drive model and firmware version.
Bringup Fails at vCenter Deployment
Always a DNS or datastore issue. Run nslookup vcenter-mgmt.vcf.lab from Cloud Builder AND from each ESXi host. Both A and PTR records must resolve. If DNS is correct, check that the vSAN datastore was created successfully in Phase 2 — if vSAN ESA claiming failed partially, Phase 3 (vCenter deployment) will fail because there is no datastore to deploy to. Check /var/log/vmware/vcf/cloudbuilder/vcf-bringup.log for the exact error message.
NSX-T Transport Node Prep Stuck at 50%
This is almost always an MTU mismatch. The NSX TEP vmkernel (vmk3) needs end-to-end MTU 9000 — check the physical switch port MTU, the DVS port group MTU, and the vmkernel adapter MTU. A common miss is setting MTU 9000 on the DVS but leaving the upstream physical switch port at MTU 1500. Test with a large ICMP ping: ping ++netstack=vxlan -d -s 8972 <TEP-IP-of-another-host>. If this fails but a small ping succeeds, you have an MTU problem in the path.
SDDC Manager Can’t Reach ESXi Hosts After Bringup
The vmk0 management vmkernel gets migrated from the standard vSwitch to the DVS during bringup. If the VLAN tag on the DVS management port group doesn’t match the physical switch VLAN for management traffic, hosts become unreachable. Recover by connecting a KVM/IPMI to the host and running esxcfg-vswitch commands to temporarily recreate a standard vSwitch with the correct VLAN, reconnect, then fix the DVS port group VLAN ID in the vSphere Client.
Day 2 Operations — Lifecycle Management
SDDC Manager is the single tool for all Day 2 operations. Patching works through Bundles — SDDC Manager downloads component update bundles from Broadcom’s depot (or an air-gapped depot server) and applies them in the correct order: ESXi → vCenter → NSX-T → SDDC Manager itself. Navigate to Lifecycle Management → Release Catalog to see available bundles and their dependency chains. Never manually patch individual components outside of SDDC Manager — doing so breaks the SDDC Manager inventory and can cause future lifecycle operations to fail.
# Check available bundles from SDDC Manager CLI
ssh admin@sddc-mgr.vcf.lab
# From the SDDC Manager shell:
vcf-lcm bundle list

# Trigger a bundle download
curl -k -u admin@local:VMware1!VMware1!   https://sddc-mgr.vcf.lab/v1/bundles   -X POST -H 'Content-Type: application/json' -d '{
    "bundleId": "bundle-9.1.1.0-xxxxx"
  }'

# Monitor download progress
curl -k -u admin@local:VMware1!VMware1!   https://sddc-mgr.vcf.lab/v1/bundles/{bundle-id} |   python3 -m json.tool | grep -E "status|downloadProgress"
Key Takeaways
vSAN ESA is NVMe-only — there is no exception, no workaround, and no fallback to SAS or SATA. Budget accordingly. DNS is the root cause of 80% of failed bringups — build your DNS zone first, validate every record from every host, then deploy. Never patch outside SDDC Manager — the lifecycle database becomes the source of truth and manual changes break it. Cloud Builder is disposable — once bringup completes successfully, you can power it off; SDDC Manager takes over all lifecycle functions. NSX-T MTU must be 9000 end-to-end — this means physical switch ports, DVS, and vmkernel adapters all aligned, or your overlay traffic will silently drop.