
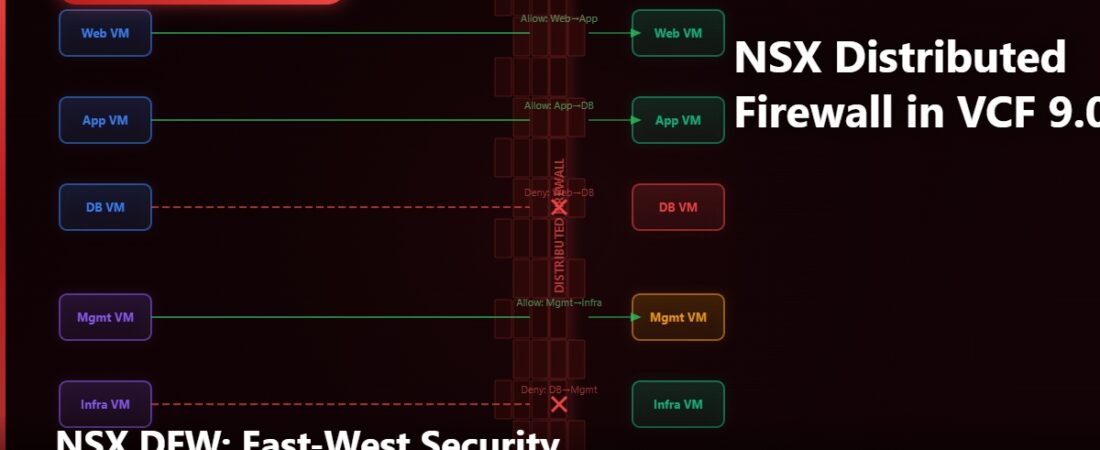
In the previous post I covered NSX segments — how the overlay works, what transport zones are, and how Tier-0 and Tier-1 gateways connect your virtual networks to the physical world. Now I want to talk about the feature that, in my experience, is the biggest reason organisations actually care about NSX beyond just “software-defined networking”: the Distributed Firewall.
Most people come to NSX thinking about VLANs and overlays. They stay because of the DFW.
What Makes It “Distributed”
A traditional firewall sits at the perimeter. Traffic comes in from the internet or from another network, hits the firewall, gets inspected, and either passes or gets dropped. That works fine for north-south traffic — anything coming into or leaving your environment.
But what about east-west traffic? VM-A talking to VM-B, both running inside your data centre, potentially on the same host? With a perimeter firewall, that traffic never passes through the firewall at all. The two VMs can communicate freely, and if VM-A gets compromised, it can reach every other VM on the same VLAN without any inspection.
The NSX Distributed Firewall runs directly in the hypervisor kernel on every ESXi host. Every packet leaving a VM’s virtual NIC is inspected against the DFW policy before it reaches the network — even if the destination is another VM on the same host. There’s no path around it. The DFW enforces policy at the vNIC itself, not at a network boundary.
This is what micro-segmentation actually means in practice. You can isolate individual workloads from each other at the packet level, regardless of what network segment they’re on, without moving any physical cables or changing any switch configuration.
How DFW Policy Is Structured
NSX DFW policy is organised in layers. At the top level there are security policies, each containing rules. Policies are evaluated from top to bottom, and the first matching rule wins. Within a policy the rules are also evaluated in order.
Each rule specifies a source, a destination, a service (port/protocol), and an action — Allow, Drop, or Reject. The source and destination can be IP addresses, ranges, segments, or — and this is where it gets interesting — security groups.
There are two main policy categories in NSX Manager under Security > Distributed Firewall:
Ethernet rules operate at Layer 2 and filter based on MAC addresses and Ethertype. Most environments don’t need to touch these, but they’re there if you need them.
Emergency, Infrastructure, Environment, and Application rules operate at Layer 3 and 4. These are what you’ll be writing for workload security. The categories are evaluated in that fixed order — Emergency always wins, then Infrastructure, then Environment, then Application. This lets you put broad allow rules for management traffic in Infrastructure and get granular with Application rules for your workloads, without worrying that an Application Deny will accidentally block your vCenter management traffic.
Security Groups: The Right Way to Reference Workloads
Writing DFW rules that reference specific IP addresses is a trap. It works, but you end up with rules that break every time a VM is re-IP’d, cloned, or migrated. The right approach is security groups.
A security group is a logical container for workloads. You can define group membership in several ways: by VM name, by tag, by segment, by IP address range, or by a combination of criteria. The most powerful — and the one I use almost exclusively — is tag-based membership.
Here’s how it works in practice. You create a tag called Environment:Production and another called App:WebServer. You apply those tags to your web server VMs in NSX Manager (or via the API, or via vCenter). You create a security group whose membership rule says “any VM with tag App:WebServer AND tag Environment:Production”. Then you write DFW rules that reference that security group as source or destination.
When you deploy a new web server VM and tag it correctly, it’s automatically included in the security group and the DFW rules apply immediately. No manual rule updates. No IP address management. The policy follows the workload identity, not its network address.
Writing Your First DFW Policy
Let’s build a simple policy that allows web traffic to a web tier and blocks everything else between tiers. Assume you have two security groups already created: SG-WebTier and SG-AppTier.
In NSX Manager, go to Security > Distributed Firewall and click Add Policy under the Application section. Name it something like WebApp-Tier-Isolation.
Add your first rule: Source = Any, Destination = SG-WebTier, Service = HTTP and HTTPS, Action = Allow. This lets anyone reach the web tier on port 80 and 443.
Add a second rule: Source = SG-WebTier, Destination = SG-AppTier, Service = your application’s specific port (say TCP 8080), Action = Allow. This lets the web tier reach the app tier on that specific port only.
Add a third rule at the bottom of the policy: Source = Any, Destination = SG-AppTier, Service = Any, Action = Drop. This blocks everything else from reaching the app tier that wasn’t explicitly allowed above.
Publish the policy. It takes a few seconds to realise across all transport nodes. From this point, a VM in SG-WebTier can reach SG-AppTier on TCP 8080, nothing else can reach SG-AppTier at all, and that rule enforcement is happening in the hypervisor kernel on every host — not at a network boundary somewhere upstream.
The Default Deny Question
NSX DFW has a default rule at the bottom of the rule table that applies to all traffic not matched by any other rule. By default it’s set to Allow. This is deliberate — if you turn on NSX DFW and immediately switch to default deny, you’ll likely break things you didn’t expect to break, because suddenly all that background traffic (Windows domain traffic, management agents, monitoring, backup clients) that was always flowing freely is getting dropped.
The approach I recommend is to start with the default set to Allow, add your explicit allow rules for the traffic you know about and care about, monitor what’s flowing using NSX flow data (more on that shortly), and only move toward a tighter default once you have confidence in your rule coverage. Switching to default drop without that visibility is how you create an incident at 3am.
Flow Data and Rule Hits
One of the genuinely useful things about NSX DFW is the visibility it provides. Under Security > Distributed Firewall you can view rule hit counts — you can see exactly which rules are matching traffic and which aren’t. Rules with zero hits over a long period are either redundant or covering something that never actually happens.
NSX also integrates with the Traffic Analysis feature (previously called Flow Monitoring in older NSX-T versions). This shows you actual flows — source IP, destination IP, port, protocol, rule that matched, and whether it was allowed or dropped. This is how you build confidence before tightening up a default-deny policy. Run flow monitoring for a week, look at what’s flowing between your workloads, and build your allow rules around what you actually see, not what you assume.
In a VCF environment, you access NSX Manager through the SDDC Manager UI or directly at the NSX Manager FQDN. The flow analysis tools are all in the NSX Manager Security section — you don’t need a separate product or licence add-on to use them.
Identity-Based Firewall
One more capability worth knowing about: NSX supports identity-based firewall rules that use Active Directory group membership as the rule criteria. A user logs in to a Windows VM, NSX picks up the AD group membership via the NSX Agent running on the guest, and applies DFW rules based on who is logged in rather than which VM they’re using.
This is more relevant for VDI and published application environments than for server workloads, but it’s a powerful tool in the right context. If you have a VCF-based VDI deployment using Horizon, the identity firewall lets you say “members of the Finance AD group can reach the Finance database servers, regardless of which desktop they’re using.” That’s a completely different security model than IP-based rules.
Common Issues
The most frequent problem I see is rules that are ordered incorrectly. Remember, first match wins. If you have a broad “Allow Any to Any” rule somewhere above a specific Drop rule, the Drop rule will never fire. Always audit rule order when something isn’t behaving as expected.
The second most common issue is security group membership not working as expected. If a VM isn’t matching a tag-based security group, check whether the tag was applied in NSX Manager (not just vCenter) and verify the tag scope and value match exactly — NSX tags are case-sensitive.
Finally, if you publish a policy and enforcement doesn’t seem to take effect, check the realisation state in NSX Manager. Under each policy you can see whether the policy has been successfully pushed to all transport nodes or if there are nodes still pending or in error. A host with a failed NSX agent will show realisation errors and will not enforce the updated policy until the agent is repaired.
What’s Next
Next up in this series is vSAN ESA — the storage architecture that ships with VCF 9.0. If you’ve worked with vSAN before but not with ESA specifically, there are some important differences from the OSA model that are worth understanding before you start building storage policies.