
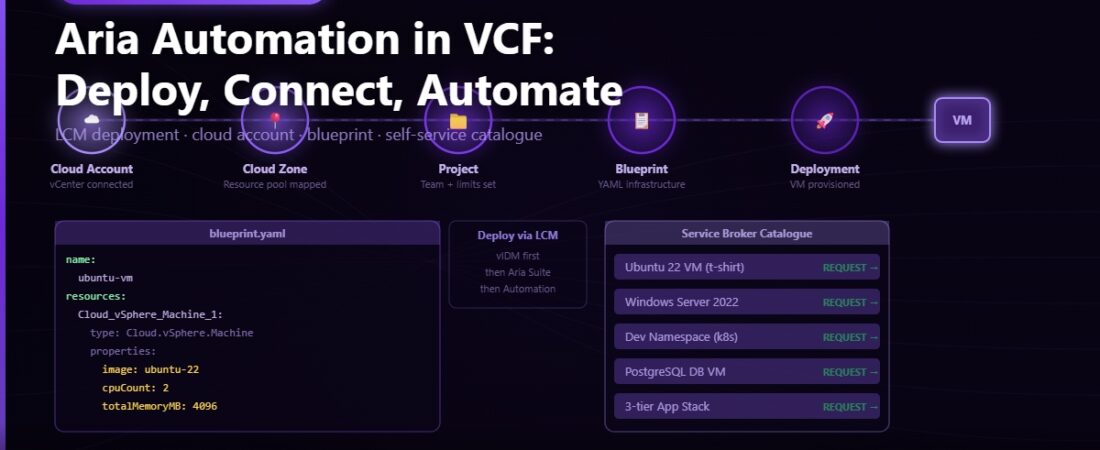
Aria Automation is one of those products that gets included in VCF licensing diagrams but rarely gets deployed in practice, at least not early on. Most teams bring up the management domain, get vSAN and NSX working, deploy a workload domain, and then park Aria Automation as a “we’ll do that later” item. Later often never comes.
Which is a shame, because once it’s set up, Aria Automation genuinely changes how a team interacts with infrastructure. Self-service VM provisioning, approval workflows, automated day-2 operations — the value compounds over time. The problem is the initial setup has enough steps that it’s easy to lose the thread.
This post walks through deploying Aria Automation via LCM, connecting it to vCenter and NSX, and building a simple VM provisioning blueprint from scratch.
What Aria Automation Actually Does
At its core, Aria Automation is a self-service portal and workflow engine for infrastructure. Users request resources through a catalogue. Those requests go through approval workflows if required. The approved request triggers automation that provisions the resource — a VM, a network, a Kubernetes namespace, whatever you’ve configured — and hands it back to the requester in a consistent, policy-compliant state.
In VCF 9.0, Aria Automation 8.18.x is the on-premises version deployed via Aria Suite Lifecycle. Four key concepts to know before you start: cloud accounts (connections to vCenter, NSX, and other infrastructure), cloud zones (subsets of a cloud account’s resources available for provisioning), projects (organisational units that group users and cloud zones), and blueprints (templates that define what gets provisioned). Those four concepts are the scaffolding everything else hangs on.
Deploying Aria Automation via Aria Suite Lifecycle
Aria Automation is deployed through Aria Suite Lifecycle Manager, not installed directly. In VCF, LCM is already deployed as part of the management domain. Log in to the Aria Suite Lifecycle Manager UI — typically https://aria-lcm.yourdomain.local — and navigate to Lifecycle Operations, then click Create Environment.
Give the environment a name, select the vCenter where Aria Automation will be deployed, and choose the target datastore and network. Aria Automation is a multi-VM product: the deployment includes the Automation appliance itself plus a PostgreSQL database appliance. In a lab, standard mode with two VMs is fine. Production should use clustered mode for availability.
Under Products, select Aria Automation and the version matching your VCF 9.0 BOM. Fill in the network configuration: IP addresses for each appliance VM, the FQDN for the Aria Automation endpoint, DNS, NTP, and admin credentials. Make sure DNS entries exist for every FQDN before submitting. Submit and wait 45-90 minutes for LCM to deploy and configure everything.
Connecting vCenter as a Cloud Account
Log in to Aria Automation with the configadmin account and the password set during LCM deployment. Go to Infrastructure > Connections > Cloud Accounts and click Add Cloud Account, then select vCenter. Enter the vCenter FQDN and a dedicated service account with Administrator role — not the SSO admin. Validate the connection, then on the next screen add NSX as a linked cloud account. Providing NSX credentials here lets blueprints create and manage NSX segments and security groups as part of provisioning workflows.
Creating a Cloud Zone and Project
A cloud account gives Aria Automation visibility into your vCenter. A cloud zone defines which part of that vCenter is available for provisioning. Go to Infrastructure > Configure > Cloud Zones, create a new zone, and under the Compute tab select the clusters you want to include. Under Network, add the NSX segments blueprints can use. Under Storage, add the datastores or storage policies.
Then create a project under Infrastructure > Administration > Projects. Add your cloud zone to the project, add the users who should be able to provision through it, and set resource quotas — CPU, memory, storage, VM count limits — if needed. The project is the link between users and the infrastructure they’re allowed to consume.
Building Your First Blueprint
Go to Design > Blueprints and click New. Assign it to your project. Blueprints are written in YAML using Aria Automation’s cloud template language. Here’s a minimal blueprint that provisions a Linux VM from a template and attaches it to an existing NSX segment:
formatVersion: 1
inputs:
  vm_name:
    type: string
    title: VM Name
  cpu_count:
    type: integer
    title: CPU Count
    default: 2
  memory_gb:
    type: integer
    title: Memory (GB)
    default: 4

resources:
  Cloud_vSphere_Machine_1:
    type: Cloud.vSphere.Machine
    properties:
      name: '${input.vm_name}'
      image: Ubuntu-22.04-Template
      cpuCount: '${input.cpu_count}'
      totalMemoryMB: '${input.memory_gb * 1024}'
      networks:
        - network: '${resource.Cloud_NSX_Network_1.id}'
  Cloud_NSX_Network_1:
    type: Cloud.NSX.Network
    properties:
      networkType: existing
      name: seg-workload-web-192168100
The template asks for a VM name, CPU count, and memory. It deploys from a template called Ubuntu-22.04-Template (which must exist in your vCenter) and connects it to an existing NSX segment. Save the blueprint and click Deploy to test it — fill in the input form, submit, and watch the deployment run in real time. The VM will appear in vCenter a couple of minutes later.
Publishing to the Catalogue
A blueprint in the Design section is only visible to Aria Automation admins. To make it available to end users, click Version to snapshot it, then Release to make it shareable. Go to Service Broker > Content and Policies > Content Sources, add a source pointing to your Aria Automation instance, and verify your blueprint appears in the Catalogue. Set policies on the catalogue item — who can see it, whether it needs approval, how long deployments can live before they’re automatically cleaned up.
Once published, project members can request the blueprint from Service Broker without ever touching vCenter or the Aria Automation admin interface. They fill in the form, submit, and their VM appears. That’s the whole point — infrastructure access without infrastructure access.
Day-2 Operations
Aria Automation tracks every deployment it creates. Users can see their deployments under Service Broker > Deployments and perform day-2 actions: power on/off, resize, add a disk, take a snapshot, or delete the whole deployment (which removes all resources it created). You can define custom day-2 actions using Aria Automation Orchestrator workflows — domain joins, configuration management triggers, external system notifications.
Even the built-in actions handle the most common requests that normally generate tickets: resize my VM, add a disk, take a snapshot before we troubleshoot. Aria Automation handles all of those without involving the VI admin team.