
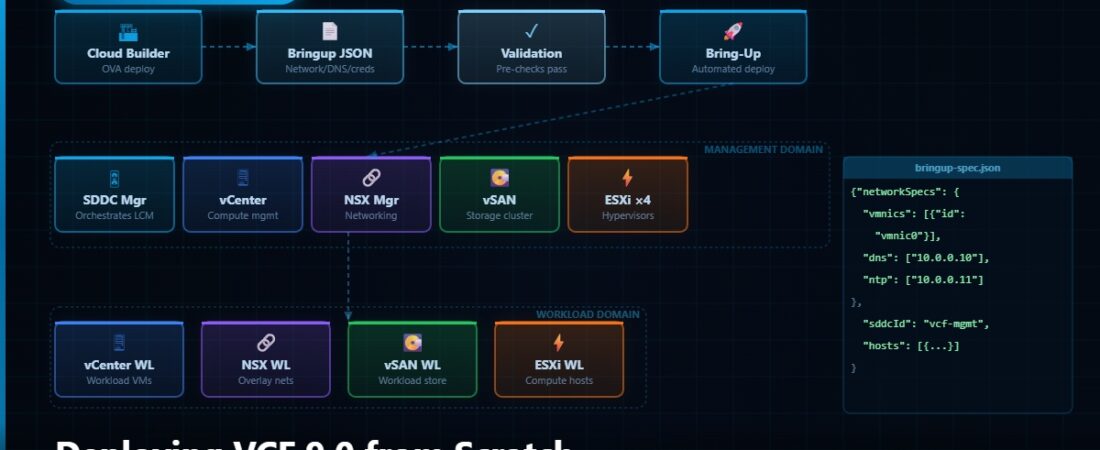
Deploying VCF from scratch for the first time is one of those tasks where the preparation takes longer than the deployment itself. The actual Cloud Builder bring-up process, once you start it, is largely automated. What takes time is getting every prerequisite exactly right before you click Go — because Cloud Builder will fail fast if anything is off, and some of those failures can leave you with partially configured infrastructure that’s annoying to clean up.
This walkthrough covers a full VCF 9.0 management domain deployment. I’ll go through prerequisites, the bring-up JSON file, Cloud Builder, and the SDDC Manager post-deployment steps you need to do before you’re actually ready to use the environment.
What You Need Before You Start
Four physical hosts is the minimum for a VCF management domain. They need to be on the VMware Compatibility Guide for VCF 9.0 — not just vSphere, specifically VCF. The guides are different. CPU must be from the VCF supported list (Intel Skylake or later, AMD EPYC Naples or later as of VCF 9.0). All four hosts need identical CPU, RAM, and storage configuration. Mixed hardware in the management cluster is not supported.
Minimum RAM per host is 512GB for a production management domain, though you can get away with 192GB per host in a lab. Storage for the management domain hosts needs to be either vSAN-ready (NVMe for ESA, SSD+NVMe for OSA) or an external shared datastore if you’re not using vSAN.
Networking is the area where most first-time VCF deployments run into trouble. You need the following VLANs pre-created and trunked to your hosts before Cloud Builder runs: Management (for ESXi management, vCenter, NSX Manager, SDDC Manager), vMotion, vSAN (if using vSAN), NSX Host Overlay (for TEP traffic), NSX Edge Overlay, and NSX Edge Uplink VLANs for your Tier-0 BGP connections. All of these need to be separate VLANs. Trying to combine them is not supported and will cause bring-up failures.
DNS is another common failure point. Every component that VCF deploys needs forward and reverse DNS entries configured before bring-up. That means SDDC Manager, vCenter, NSX Manager (all three nodes), the first ESXi host (Cloud Builder uses its hostname to validate DNS), and the NSX Edge nodes. Create all the DNS entries first, verify them from a separate machine on the management network, and only then start Cloud Builder. Bring-up validators are strict about DNS — an IP that resolves but doesn’t reverse-resolve will fail.
NTP also needs to be working on all hosts before bring-up. VCF is particular about time synchronisation. All hosts should be pointing to the same NTP source, and time should be within a few seconds of each other. Cloud Builder will check this during validation.
Preparing Your Hosts
Install ESXi 9.0 on each host manually using the Broadcom-provided ISO from the Support Portal. Do not use an OEM image unless it’s specifically listed as compatible with VCF 9.0 in the VCF compatibility matrix. Some OEM ESXi images include additional VIBs that conflict with NSX VIBs that Cloud Builder installs during bring-up.
After ESXi installation on each host, configure the management IP address, hostname, and default gateway on the management vmkernel adapter. Set DNS and NTP in the ESXi configuration. Enable SSH temporarily — Cloud Builder needs SSH access to the hosts during bring-up and will fail if SSH is disabled.
Do not configure any VDS, vSAN, or NSX settings on the hosts manually. Cloud Builder creates all of that during bring-up. If you’ve already set up a VDS on the hosts from a previous attempt, clean it up before starting Cloud Builder — partially configured vSphere networking conflicts with what Cloud Builder expects to find.
Deploying Cloud Builder
Cloud Builder is an OVA that you deploy to any ESXi host — it doesn’t have to be one of the four management domain hosts, though it can be. In a lab setup I typically deploy it to one of the four hosts temporarily and then remove it after bring-up completes.
Download the Cloud Builder OVA from Broadcom Support Portal — it’s listed under VMware Cloud Foundation downloads. Deploy it using the vSphere Client or the ESXi embedded host client. Give it 4 vCPU and 8GB RAM. Configure its IP address in the management VLAN. It needs to be able to reach all four management domain hosts over the management network.
Access the Cloud Builder UI at https://cloudbuilder-ip with the credentials you set during OVA deployment. The UI walks you through the bring-up process in a wizard format.
The Bring-Up JSON File
Cloud Builder uses a JSON configuration file that describes your entire management domain: host details, network topology, IP addresses, DNS names, credentials, and component configuration. This file is called the bring-up spec, and getting it right is the most important part of a successful VCF deployment.
Broadcom provides a sample bring-up spec in the VCF documentation, and the Cloud Builder UI has a parameter guide that explains every field. Do not try to create the JSON from scratch — start from the Broadcom sample spec and modify it for your environment. The JSON structure is complex and easy to get wrong if you’re building it without a reference.
Key sections in the bring-up spec:
hosts — Each host entry includes the hostname, management IP, credentials, and the physical NIC to VLAN mappings. VCF 9.0 typically uses a two-NIC or four-NIC design. The bring-up spec must accurately reflect your physical NIC layout.
networks — Define each VLAN, its subnet, gateway, and the MTU. The overlay networks (NSX TEP, Edge overlay) typically use jumbo frames (MTU 9000). Make sure your physical switches are configured to carry jumbo frames on those VLANs or TEP tunnel establishment will fail.
vcenters — The vCenter FQDN, IP, SSO domain, and administrator credentials for the new vCenter that Cloud Builder will deploy.
nsxt — NSX Manager cluster configuration including all three manager node IPs, the cluster VIP, and the admin credentials.
nsxEdge — Edge node configuration including the uplink IPs, Tier-0 BGP configuration (ASN, peer IPs), and the overlay IP pool for Edge TEPs.
Running the Validation
Upload your bring-up JSON to Cloud Builder and run the pre-validation before attempting the actual bring-up. Cloud Builder’s validator checks DNS resolution for every hostname in the spec, SSH connectivity to each host, NTP status, host hardware compatibility, VLAN reachability, and a handful of other things. Run validation, fix everything it flags, and run it again until you get a clean pass.
I’ve seen people skip validation to save time and then spend hours debugging bring-up failures that the validator would have caught in minutes. Run the validation. Every time.
The Bring-Up Process
Once validation passes, click Deploy SDDC. Cloud Builder now works through the deployment sequence automatically:
First it configures the VDS on all four hosts and sets up the port groups for each VLAN. Then it deploys vCenter as a VM on the first host. Then it creates the management cluster in vCenter and adds all four hosts. vSAN is configured on the cluster and the management VMs are migrated to the new vSAN datastore. NSX Manager nodes are deployed (three VMs) and the NSX cluster is formed. NSX is configured on all host transport nodes. Edge nodes are deployed and the Tier-0 gateway is created with its BGP configuration. Finally, SDDC Manager is deployed and handed control of the environment.
Total time for a clean deployment with good hardware and fast storage is around 3-5 hours. Most of that is waiting for VMs to deploy and services to come up.
The Cloud Builder UI shows each step with a status indicator. If any step fails, Cloud Builder stops and shows you the error. Most failures at this stage are configuration issues in the bring-up spec — wrong IP, VLAN not reachable, credential mismatch. Check the Cloud Builder logs at /var/log/vmware/vcf/bringup for detailed error output when the UI message isn’t specific enough.
After Bring-Up Completes
When Cloud Builder finishes, open SDDC Manager at the URL shown in the Cloud Builder completion screen. Log in with the admin credentials you specified in the bring-up spec.
First thing to do: rotate all the default credentials. SDDC Manager has a Credential Management section under Administration. Rotate the vCenter admin password, the NSX admin password, and the ESXi host passwords. SDDC Manager tracks these credentials and uses them for LCM and other operations — always rotate through SDDC Manager, not directly in vCenter or NSX, so the stored credentials stay in sync.
Configure your backup target for SDDC Manager. Go to Administration > Backup and set up an SFTP or NFS target. SDDC Manager backs itself up daily by default once a target is configured. Without a backup, a failed SDDC Manager appliance means manually rebuilding your management domain inventory from scratch.
Check that your Tier-0 BGP sessions are up. In NSX Manager go to Networking > Tier-0 Gateways, click your Tier-0, and check the BGP neighbor status. If BGP sessions aren’t establishing, the most common causes are incorrect ASN or peer IP in the bring-up spec, MTU mismatch on the Edge uplink VLAN, or the upstream router not accepting the BGP connection from the Edge’s uplink IP.
You’re now ready to deploy workload domains. That’s a separate SDDC Manager workflow — go to Workload Domains, add the hosts you want in the domain, configure the network and storage, and SDDC Manager handles the rest in a process similar to what Cloud Builder just did for the management domain, but driven through the SDDC Manager UI instead of a standalone tool.