
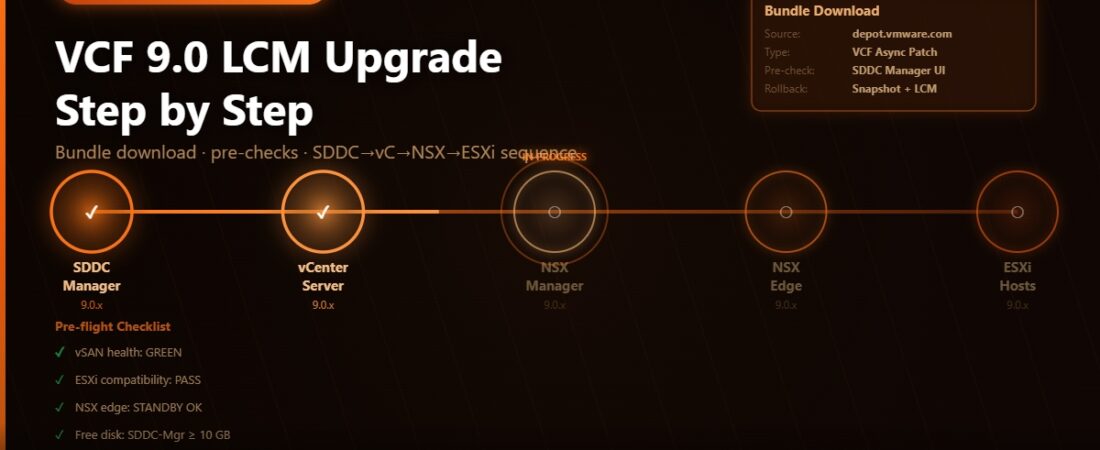
The first time I ran a VCF upgrade through LCM I probably spent more time reading documentation than actually running the upgrade. The process itself isn’t that complicated once you’ve done it, but the number of moving parts — SDDC Manager, ESXi, vCenter, NSX, Aria components — means there’s a lot to keep track of. This walkthrough covers the full flow from downloading bundles to confirming everything landed correctly.
I’m covering a management domain upgrade here. Workload domain upgrades follow the same pattern but the management domain always goes first.
Before You Start
Take a snapshot of SDDC Manager. If something goes badly wrong early in the upgrade, this gives you a quick rollback path before the process has touched any compute or network components. vCenter and NSX manager VMs are typically not snapshotted before an LCM upgrade — LCM has its own rollback checkpoints — but snapping SDDC Manager itself takes seconds and has saved me time on at least one occasion.
Confirm your vSAN cluster health is clean. Open vCenter, navigate to your management cluster, go to Monitor > vSAN > Health, and make sure there are no critical or error-level issues. A resync in progress, a failed disk, or a host in maintenance will cause the LCM pre-check to fail and you’ll need to resolve it before the upgrade will proceed.
Check NSX manager health at the NSX Manager UI under System > Appliances. All three NSX Manager nodes (if you’re running a clustered deployment, which VCF does by default) should show Stable status. If any node shows degraded, fix it before starting the upgrade.
Verify you have enough free capacity in vSAN. During an ESXi host upgrade, LCM puts each host into maintenance mode one at a time. The cluster needs enough headroom to tolerate one host’s worth of VMs being evacuated. If your cluster is running above 70-75% capacity, you may need to either add temporary capacity or shut down non-critical VMs before the upgrade.
Step 1: Download the Bundles
Log in to SDDC Manager and navigate to Lifecycle Management > Bundle Management. SDDC Manager needs internet access to the Broadcom depot, or you need to have configured an offline depot. In most production environments where the management network doesn’t have direct internet access, you’ll use offline bundles.
For an offline upgrade, download the bundles from the Broadcom Support Portal: search for VMware Cloud Foundation, select your target version, and download the bundle files. You’ll need the SDDC Manager bundle, the ESXi bundle, the vCenter bundle, and the NSX bundle separately — they’re not combined into a single file. For a full management domain upgrade these downloads typically total 15-20GB.
Once downloaded, upload them to SDDC Manager via Lifecycle Management > Bundle Management > Upload Bundle. Upload them in any order. SDDC Manager validates each bundle’s checksum on upload and will reject corrupted files. After all bundles are uploaded and validated, the target upgrade version will appear as available in the upgrade workflow.
Step 2: Run the Pre-checks
In SDDC Manager navigate to Lifecycle Management > Upgrades. Select your management domain and the target version. Before LCM will let you kick off the actual upgrade, it runs a pre-check sequence that validates your environment is ready.
The pre-checks cover a lot of ground: vSAN health, NSX node status, host connectivity, vCenter inventory consistency, available disk space on all management appliances, DNS resolution for all components, NTP sync status, and password validity for all service accounts LCM uses. This takes around 10-15 minutes to run.
Read the pre-check results carefully. Warnings can usually be bypassed with acknowledgment. Errors cannot — the upgrade will not proceed until every error is resolved. Common errors I’ve seen include expired service account passwords (SDDC Manager stores credentials for vCenter, NSX, and ESXi hosts, and if any have been rotated outside LCM without updating SDDC Manager, the pre-check catches it), DNS entries missing for components added after initial deployment, and vSAN health warnings that look minor but that LCM treats as blockers.
Step 3: SDDC Manager Upgrade
LCM upgrades components in a fixed order. SDDC Manager always upgrades first. Click Start Upgrade and watch the task log.
The SDDC Manager upgrade takes 20-40 minutes. The SDDC Manager appliance will restart as part of the process. During the restart, the SDDC Manager UI will be unavailable — this is expected and does not affect any running workloads. When the UI comes back, confirm the version in the footer matches the target version before proceeding.
Do not touch anything during the SDDC Manager upgrade. No vCenter tasks, no NSX changes, no host maintenance — keep the environment completely idle. LCM is building a state map of your infrastructure before it starts changing things, and concurrent operations can create inconsistencies that cause later upgrade steps to fail.
Step 4: vCenter Upgrade
After SDDC Manager, LCM upgrades vCenter. This is the longest single component upgrade — typically 45-90 minutes depending on the size of your vCenter inventory and the speed of the underlying storage.
During the vCenter upgrade, all vCenter management operations are unavailable. VMs continue running — ESXi doesn’t depend on vCenter for VM operation — but you cannot create, modify, or monitor anything through vCenter or any tool that calls the vCenter API (Aria Operations, backup jobs, PowerCLI scripts). Plan for this window in your maintenance window planning.
vCenter goes through several stages: the upgrade ISO is mounted, the installer extracts, the old vCenter is put into a pre-upgrade state, the new version is deployed alongside it, data is migrated, and then the old instance is removed. If the upgrade fails mid-way, vCenter has a built-in rollback — the old instance can be brought back. LCM will surface this option if the upgrade fails and the rollback is available.
Step 5: NSX Upgrade
NSX is next, and this is where the upgrade takes the most wall-clock time. NSX uses a rolling upgrade model where each component is upgraded in sequence: NSX Manager nodes first, then the NSX Edge nodes, then the transport nodes (your ESXi hosts).
The NSX Manager upgrade itself takes around 20-30 minutes per node and the three-node cluster upgrades sequentially. During this time the NSX management plane is disrupted but the data plane continues — VMs keep their network connectivity, DFW rules stay enforced, and routing keeps working. NSX was designed so that a management plane outage doesn’t affect running workloads.
Edge node upgrades follow. Each Edge node is upgraded in sequence. If you’re running active-standby Edge clusters, the upgrade fails over to the standby before upgrading the active node, which means no routing interruption. Keep an eye on the NSX upgrade UI — it shows you the current Edge upgrade status and will surface any failover issues.
Transport node upgrade (ESXi hosts) is the longest phase. LCM puts each host into maintenance mode, evacuates its VMs via vMotion, upgrades the NSX VIBs on the host, brings the host back, and moves to the next one. In a 4-host management cluster this takes 30-60 minutes. In larger clusters, budget 15-20 minutes per host.
Step 6: ESXi Upgrade
After NSX, LCM upgrades ESXi on each host. The process is the same rolling approach — one host at a time, maintenance mode, vMotion evacuation, upgrade, reboot, rejoin. Each host takes 10-20 minutes including the reboot.
Watch the task log for failures during the maintenance mode evacuation step. If a VM has a hard DRS anti-affinity rule, no local CD-ROM device removed, or is running a CPU/memory reservation that can’t be met on remaining hosts, the evacuation will fail and the upgrade will pause. LCM won’t skip a host — it’ll wait for you to resolve the issue and retry. Common fixes are removing the problematic VM from the DRS exception, temporarily reducing reservations, or manually migrating the VM to a different host before LCM retries.
Step 7: Verify and Clean Up
When LCM marks the upgrade complete, don’t just close the browser and declare victory. Run through a verification checklist:
In SDDC Manager, confirm all component versions match the target release. Go to Inventory and check each host, vCenter, and NSX component version listed. Compare against the BOM for your target release.
In vCenter, run the vSAN health check again. Resync operations are common after ESXi host reboots and will resolve on their own, but make sure there are no persistent errors.
In NSX Manager, go to System > Upgrade and confirm all transport nodes show the upgraded NSX version. Any host showing the old version needs investigation — the VIB upgrade may have failed silently.
Test basic network functionality: ping between VMs on different segments, verify DFW rules are still enforced, confirm Tier-0 BGP sessions are still up. A quick sanity check takes five minutes and can catch issues before they become incident tickets.
Finally, delete the SDDC Manager snapshot you took at the start. Once you’ve verified the upgrade is solid, a stale snapshot sitting on the SDDC Manager VM will grow over time and consume datastore space unnecessarily.
When Things Go Wrong
The most common failure point I’ve seen is the NSX transport node upgrade stalling when a host can’t enter maintenance mode. Check the host’s task list in vCenter for whatever operation is blocking maintenance mode — it’s usually a VM that won’t vMotion, and the reason is usually in the VM’s event log.
If an individual component upgrade fails and LCM can’t automatically retry, look at the SDDC Manager task log for the specific error message. Most LCM errors have a KB article associated — search the Broadcom knowledge base with the error string and you’ll usually find a documented resolution. The VCF upgrade process is well-trodden territory and most failure modes have been seen and documented before.