
Parts 1 to 4 built TrueNAS Scale on the Dell R620 and connected it to vCenter over NFS. Since then the pool kept disappearing after every reboot, so I reinstalled on TrueNAS 25.10 and this time wanted it done properly: storage traffic on its own VLAN over the 10GbE DAC cables, management on that same network, a proper DNS name, and a certificate from my lab CA instead of the self-signed one.
It took longer than it should have. I locked myself out twice. This post is the full sequence, including the parts that went wrong, because those are the bits you will actually hit.
The starting point
| Item | State after the reinstall |
|---|---|
| NICs | Dell NDC with 2× 10GbE SFP+ (eno1, eno2) and 2× 1GbE RJ45 (eno3, eno4) |
| Cabling | Two DACs from the SFP+ ports to the MikroTik CRS326-24S+2Q+. No RJ45 module, so no copper into that switch |
| Access | eno3 on DHCP in the out-of-band VLAN (192.168.61.x), plugged into a separate 1GbE switch |
| Target | 192.168.48.100/24 on storage VLAN 48, gateway 192.168.48.1 (the SVI on the CRS309), MTU 9000 |
| Hostname | truenas, domain still local |
Step 1: Find which switch port each DAC lands on
First job: work out which switch port each server port is plugged into. I tried to do this from the switches. My switch backup box already has a read-only SSH user on every MikroTik, so looking up a MAC address in the bridge host table is one command:
ssh backup@192.168.10.3 '/interface bridge host print where mac-address="24:6E:96:xx:xx:68"'It came back empty. eno3’s MAC showed up fine (on the uplink from the 1GbE switch), but eno1’s never did. I then tried two more tricks:
- Counting learned MACs per running SFP+ port, looking for a port with zero. Every port had 13 to 47, so that told me nothing.
- Running
ip link set eno1 downon TrueNAS and watching which switch port lost its link. None did. The Intel X520 keeps the physical link up when the interface is administratively down, so this trick does not work on this card.
In the end I walked to the rack. Both DACs went to ports 1 and 2 on the CRS326. Five minutes with a torch beat half an hour of lookups. Lesson learned: label both ends of every cable when you rack the server.
Step 2: Why the switch never saw eno1
Once I knew the port, the empty lookup made sense. Here is the port config:
/interface bridge port print detail where interface=sfp-sfpplus2
  ... pvid=1 frame-types=admit-only-vlan-tagged ingress-filtering=yes
The port is a trunk that only accepts tagged frames. I had put 192.168.48.100 straight on eno1, which sends untagged frames. The switch dropped them at ingress, before learning the MAC. So the host table stayed empty and the ping failed.
Two ways to fix it. Change the switch port to an access port on VLAN 48, or tag VLAN 48 on the TrueNAS side and leave the trunk alone. I went with tagging on TrueNAS. The trunk already carried VLAN 48, and it keeps the option of adding more VLANs to the NAS later.
Before touching the UI I proved it from the TrueNAS shell. None of this survives a reboot:
sudo ip link add link eno2 name vlan48 type vlan id 48
sudo ip link set vlan48 up
sudo ip addr add 192.168.48.100/24 dev vlan48
ping -c 5 192.168.48.1
Five replies. The switch was fine all along.
Step 3: The second DAC had no link
Along the way eno2 showed NO-CARRIER and the switch port was inactive. A reseat at both ends fixed it. If a reseat does not, swap the two DACs over: if the fault moves with the cable, the cable is bad.
One side effect caught me out. After my link-down test, eno1 stayed administratively down (no UP flag at all). sudo ip link set eno1 up brought it back.
Step 4: Make it permanent (and the rollback trap)
In the UI this is two changes: set eno2 to MTU 9000 with no IP, then add a VLAN interface.
| Field | Value |
|---|---|
| Type | VLAN |
| Name | vlan48 |
| Parent Interface | eno2 |
| VLAN Tag | 48 |
| MTU | 9000 |
| DHCP | Off, static 192.168.48.100/24 |
| Autoconfigure IPv6 | Off |
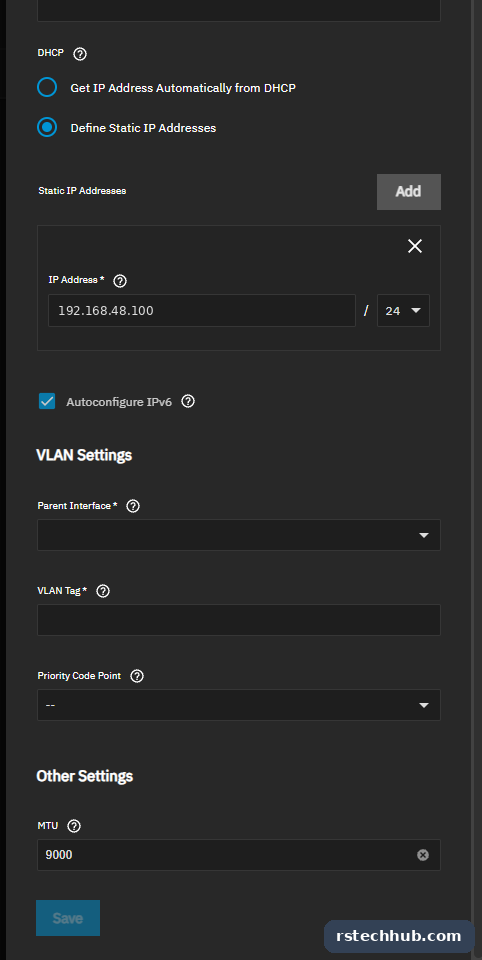
Then Test Changes. TrueNAS applies the config and gives you 60 seconds to confirm, or it rolls back. Sensible. But applying the change restarted networking, the UI dropped, I had to log in again, and by the time I found the Save Changes banner the 60 seconds were gone. Rolled back. Twice.
Two ways round it. In the Test Changes dialog, raise the timeout to 300 seconds. Or skip the timer and commit from the shell with the middleware client, which is what I did in the end:
sudo midclt call interface.update eno2 '{"mtu": 9000, "ipv6_auto": false}'
sudo midclt call interface.create '{"type":"VLAN","name":"vlan48","vlan_parent_interface":"eno2","vlan_tag":48,"mtu":9000,"ipv4_dhcp":false,"ipv6_auto":false,"aliases":[{"type":"INET","address":"192.168.48.100","netmask":24}]}'
sudo midclt call interface.commit '{"rollback": false}'
Be careful with rollback: false. There is no safety net. Have the iDRAC console open before you run it. I needed it about 30 seconds later.
Step 5: Locked out, and why
The commit worked, and the UI on 192.168.61.x went dead. From the iDRAC console:
ip -br addr
eno3          DOWN
eno2          UP    192.168.10.129/24
vlan48@eno2   UP    192.168.48.100/24

ip route
192.168.10.0/24 dev eno2 ...
192.168.48.0/24 dev vlan48 ...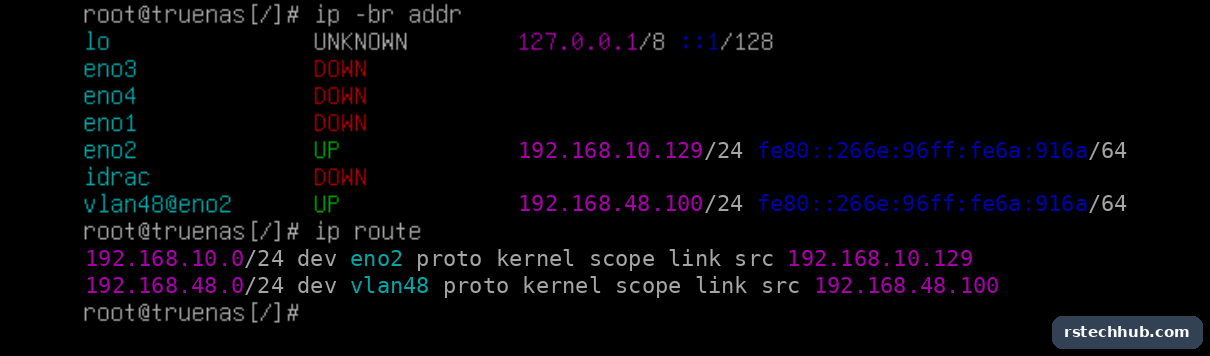
Three things had happened at once:
- eno3 was down. A fresh TrueNAS install runs DHCP on every NIC only while no interface is configured. The moment I saved vlan48, eno3 was no longer in the config, so TrueNAS switched it off.
- No default route. The saved gateway was on eno3’s subnet. With eno3 down it could not be installed, and adding it by hand fails with
Nexthop has invalid gateway. - eno2 was on DHCP. The parent interface still had DHCP enabled and picked up an address from the trunk’s native VLAN. Harmless, but not wanted.
Getting back in took one line on the console, pointing the default route at the storage VLAN gateway:
ip route add default via 192.168.48.1The UI came straight back on https://192.168.48.100. Then I made it permanent, and cleaned up eno2:
sudo midclt call network.configuration.update '{"ipv4gateway": "192.168.48.1", "domain": "lab.internal"}'
sudo midclt call interface.update eno2 '{"ipv4_dhcp": false}'
sudo midclt call interface.commit '{"rollback": false}'
If you plan to move management off the DHCP port, set the new gateway in the same change. That would have saved me the console trip.
Step 6: Check jumbo frames end to end
ip route | grep default
default via 192.168.48.1 dev vlan48

ping -c 3 -M do -s 8972 192.168.48.1
8980 bytes from 192.168.48.1: icmp_seq=1 ttl=64 time=0.386 ms
-M do forbids fragmentation and 8972 bytes plus 28 bytes of headers is exactly 9000. If this fails while a normal ping works, something in the path is still at 1500.
Step 7: DNS
On a domain controller:
Add-DnsServerResourceRecordA -ZoneName lab.internal -Name truenas -IPv4Address 192.168.48.100 -CreatePtr
Resolve-DnsName truenas.lab.internal
This threw WIN32 9715: Failed to create PTR record but created the A record. When I then tried to create the reverse zone and the PTR by hand, both already existed. The PTR had been written after all, probably by replication catching up. Check with Resolve-DnsName 192.168.48.100 before you fix what is not broken.
Step 8: A certificate from the lab CA
The last annoyance was the browser warning. My Enterprise Root CA (built in Core Infrastructure Part 4) already signs the Gitea and iDRAC certificates, so TrueNAS gets the same treatment.
Create the CSR on TrueNAS
Credentials → Certificates → Certificate Signing Requests → Add.
| Field | Value |
|---|---|
| Name | truenas |
| Profile | HTTPS RSA Certificate (RSA 2048, SHA256) |
| Subject | Country, State, Locality, Organization all required |
| Required. I used a generic admin@lab.internal so no personal address ends up in the cert | |
| Common Name | truenas.lab.internal |
| Subject Alternative Name | truenas.lab.internal and 192.168.48.100 |
| Extra Constraints | Leave the profile defaults |
The SAN field takes one entry at a time. Type the name, press Enter, type the IP, press Enter. Both must show as chips or Next stays greyed out.
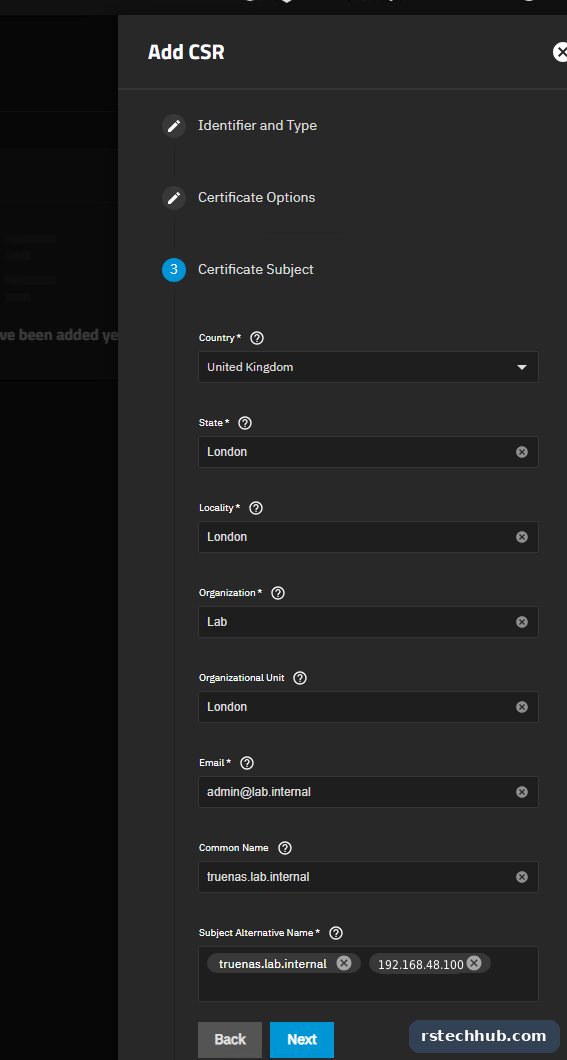
Then ⋮ → Download on the CSR. It saves two files, the CSR and the private key. Keep both for now. You will need the key in a minute.
Sign it with certreq
From any domain-joined Windows machine, in a normal PowerShell window (not ISE):
cd D:\Certs\Truenas
certreq -submit -attrib "CertificateTemplate:WebServer" .\truenas.csr .\truenas.cer
Get-Content .\truenas.cer | Set-Clipboard
Pick the CA if prompted. Certificate retrieved(Issued) Issued means you are done on the Windows side.
Import: 25.10 wants the private key
Older guides say to tick CSR exists on this system when importing. That option is gone in 25.10. The Import form asks for the certificate and the private key, which is why the Download step hands you the key.
Get-Content D:\Certs\Truenas\truenas.key | Set-ClipboardCredentials → Certificates → Import. Name truenas-lab, paste the certificate, paste the key, leave the passphrase empty and Add To Trusted Store unticked. Import.
Use it for the web UI
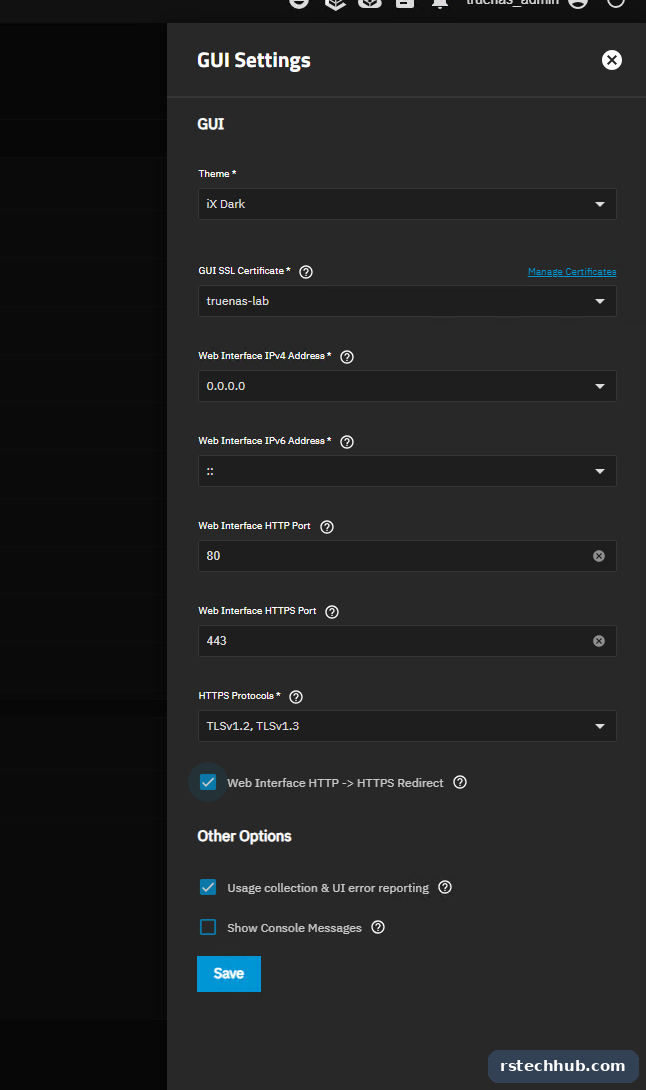
System → General Settings → GUI → Settings. Set GUI SSL Certificate to truenas-lab, tick Web Interface HTTP → HTTPS Redirect, save and let the UI restart. https://truenas.lab.internal now opens with a padlock on any machine that trusts the lab CA.
Then remove the key from Windows. It only belongs on TrueNAS:
Remove-Item D:\Certs\Truenas\truenas.key
Set-Clipboard -Value ' '
Set the timezone
Separate from the certificate, but easy to miss: the installer left my timezone on America/Los_Angeles, so the shell showed PDT and snapshot, scrub and log times were eight hours out. System → General Settings → Localization → Settings → Timezone, set it to your own (Europe/London for me) and save.
Step 9: The pool that vanished on every reboot
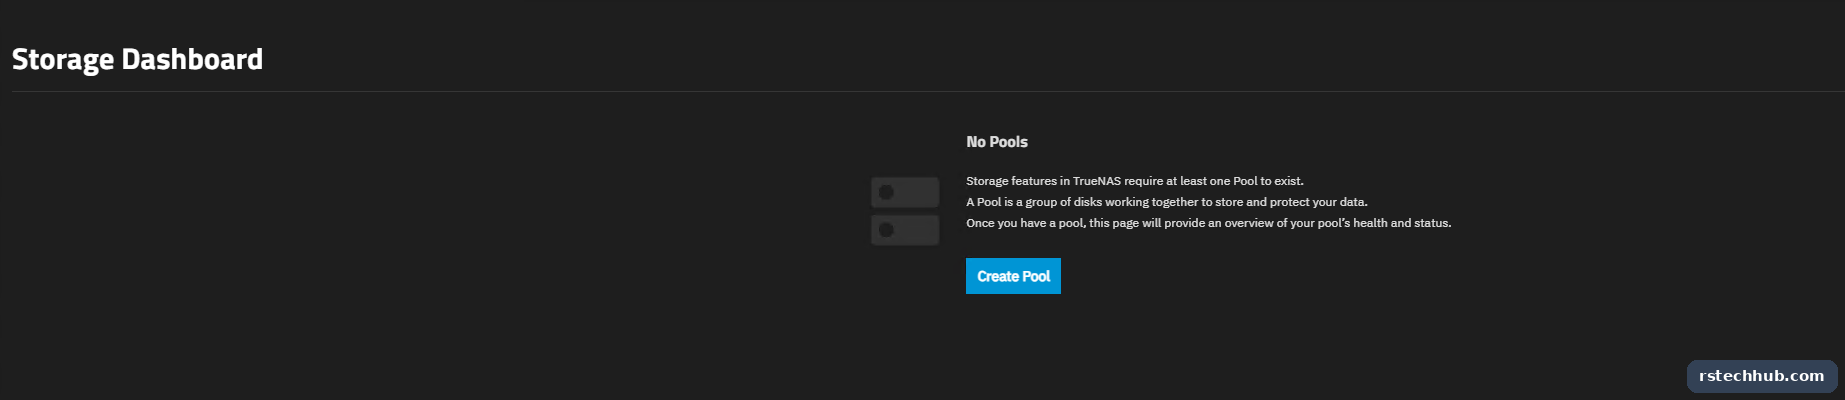
This was the problem that started the whole rebuild. Every time the R620 rebooted, the Storage page said No Pools. Before creating anything, I checked what was actually on the disks:
lspci | grep -iE 'raid|sas|hba'
02:00.0 RAID bus controller: Broadcom / LSI SAS2008 ...

sudo zpool import
  pool: tank
 state: ONLINE
action: The pool can be imported using its name or numeric identifier.
        tank        ONLINE
          raidz2-0  ONLINE   (10 disks)

sudo midclt call pool.query
[]
The controller is an LSI SAS2008 HBA, and the disks show their real model names, so ZFS sees them directly. No RAID-controller trickery. The pool was intact. The giveaway was the last line: pool.query returned an empty list. ZFS knew about tank, but the TrueNAS middleware did not.
That happens when a pool is imported from the shell with zpool import. It mounts, everything looks fine, but TrueNAS never writes it to its config database. At the next boot nothing imports it.
The fix is to import through TrueNAS itself: Storage → Import Pool → pick tank. Or from the shell, through the middleware rather than plain ZFS:
sudo midclt call --job pool.import_pool '{"guid": "<pool id from zpool import>"}'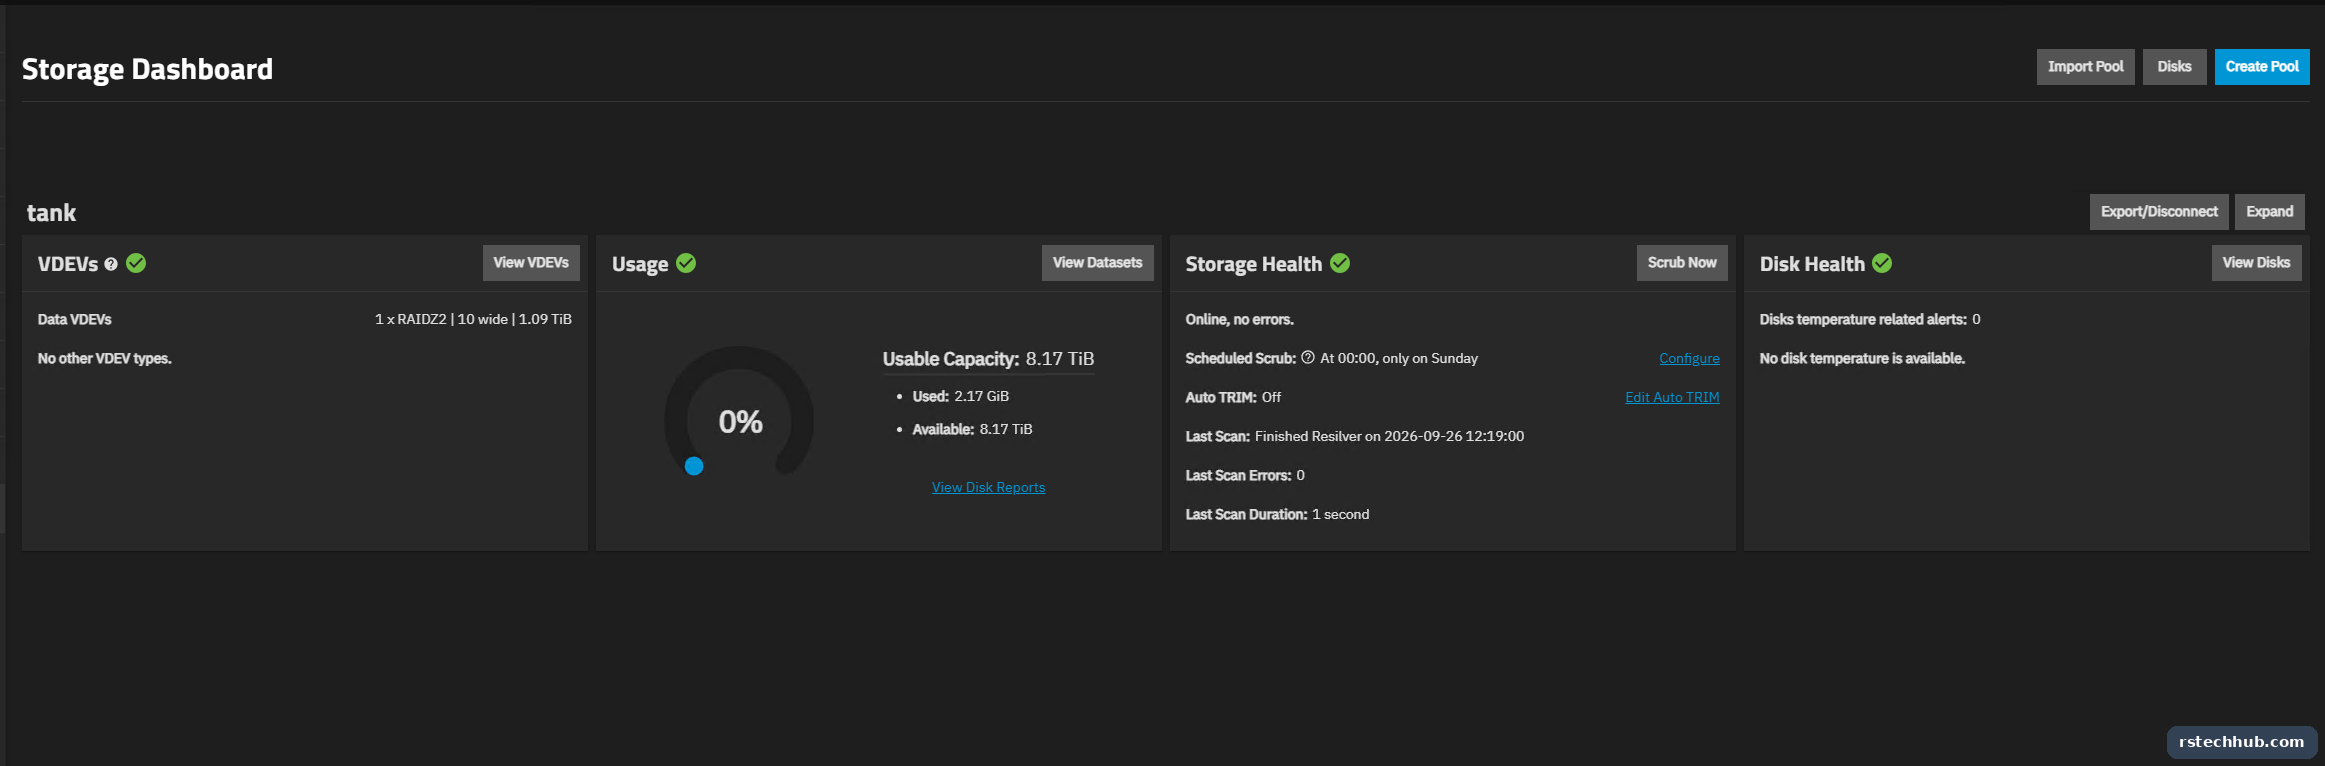
One reboot later, tank came back ONLINE on its own. Whatever you do, do not click Create Pool on those disks while the old pool is still there.
Step 10: Datasets and NFS shares
With the pool stable I wiped the old share configs and built three shares from scratch. The datasets stay; only the share definitions go.
| Dataset | Record size | Allowed networks | Used by |
|---|---|---|---|
| tank/vmware | 64K | Storage VLAN only | ESXi NFS datastore |
| tank/vcenter-backup | 128K | Management + storage | vCenter file-based backup |
| tank/veeam | 1M | Management + storage | Veeam backup repository |
vCenter and Veeam talk to TrueNAS from the management VLAN, so their shares allow both subnets. The datastore share only allows the storage VLAN. The 1M record size on the Veeam dataset suits its large sequential backup files.
All from the TrueNAS shell. One tip: the shell is zsh, and pasted lines starting with # fail with command not found, so strip comments before pasting.
sudo midclt call pool.dataset.create '{"name":"tank/vcenter-backup","share_type":"GENERIC"}'
sudo midclt call pool.dataset.create '{"name":"tank/veeam","share_type":"GENERIC","recordsize":"1M"}'

for id in $(sudo midclt call sharing.nfs.query | python3 -c 'import sys,json;print(" ".join(str(s["id"]) for s in json.load(sys.stdin)))'); do sudo midclt call sharing.nfs.delete $id; done

sudo midclt call sharing.nfs.create '{"path":"/mnt/tank/vmware","comment":"ESXi datastore","networks":["192.168.48.0/24"],"maproot_user":"root","maproot_group":"root"}'
sudo midclt call sharing.nfs.create '{"path":"/mnt/tank/vcenter-backup","comment":"vCenter file backup","networks":["192.168.10.0/24","192.168.48.0/24"],"maproot_user":"root","maproot_group":"root"}'
sudo midclt call sharing.nfs.create '{"path":"/mnt/tank/veeam","comment":"Veeam repository","networks":["192.168.10.0/24","192.168.48.0/24"],"maproot_user":"root","maproot_group":"root"}'

sudo midclt call nfs.update '{"bindip":["192.168.48.100"],"protocols":["NFSV3","NFSV4"]}'
maproot to root is needed because ESXi, the vCenter appliance and Veeam all write as root. Binding NFS to 192.168.48.100 keeps it off every other interface.
Creating shares does not start the service. showmount failed with RPC: Unable to receive until I enabled and started it (or System → Services → NFS → Running + Start Automatically):
sudo midclt call service.update nfs '{"enable": true}'
sudo midclt call --job service.control START nfs

showmount -e 192.168.48.100
Export list for 192.168.48.100:
/mnt/tank/veeam          192.168.48.0/24,192.168.10.0/24
/mnt/tank/vcenter-backup 192.168.48.0/24,192.168.10.0/24
/mnt/tank/vmware         192.168.48.0/24
How the permissions actually work
There are two layers, and it helps to know which one is doing the work.
| Layer | Setting | What it controls |
|---|---|---|
| NFS share | Allowed networks | Which client IPs can mount at all. This is the real access control. |
| NFS share | Maproot user/group = root | What UID a client’s root is treated as. Without it, root is squashed to nobody and writes fail. |
| Dataset | Owner root:root, mode 755, POSIX ACL | Who can write once mounted. With maproot to root, the clients write as root, so the defaults are enough. |
ESXi, the vCenter appliance and Veeam all connect as root with plain AUTH_SYS, no Kerberos. That is normal for a lab and for most small setups, but it means anything allowed to mount has full control of that share. So the allowed networks matter more than the file permissions. Check the datasets are still on the defaults:
ls -ld /mnt/tank/vmware /mnt/tank/vcenter-backup /mnt/tank/veeam
drwxr-xr-x ... root root ... /mnt/tank/vmware
Do not reach for chmod 777 when a mount fails with access denied. It is nearly always the maproot setting or a client IP outside the allowed networks.
Tighten to hosts once they exist
I started with whole subnets so I could test from anywhere. Once the clients are built, I will narrow each share to the hosts that use it: the ESXi storage vmk addresses for vmware, the vCenter appliance for vcenter-backup, and the Veeam proxy for veeam. Share → Edit → Hosts, or "hosts":[...] in the sharing.nfs.update call.
Note the double dash on --job. With a single dash midclt fails with unrecognized arguments.
Step 11: A storage vmk, then mount the datastore
Before adding the datastore, check the host has a VMkernel adapter on the storage VLAN. It is easy to skip, because the mount works without one. It just works badly.
Without a storage vmk, ESXi sends NFS traffic out of its management vmk to its default gateway. The CRS309 then routes it between VLANs. On a MikroTik CRS3xx, inter-VLAN routing runs on the switch CPU unless L3 hardware offload is enabled and working for that traffic. Without it, your 10GbE storage path turns into:
- A CPU-bound hop that tops out well below 10Gbps and adds latency to every I/O.
- Datastore traffic competing with management traffic on the same vmk and uplink.
- Jumbo frames lost, unless every interface in the routed path is set to 9000.
- The switch CPU busy with storage, which slows everything else it does.
With a vmk in the same subnet as the NAS, ESXi talks to it directly at layer 2. No router involved. Check in vCenter under Host → Configure → Networking → VMkernel adapters, or from the host shell:
esxcli network ip interface ipv4 get
vmkping -I vmk1 -d -s 8972 192.168.48.100
-d forbids fragmentation, so the vmkping proves both the direct path and jumbo frames end to end. If there is no vmk on the storage VLAN, add one: a port group tagged with VLAN 48 on the 10GbE switch, a VMkernel adapter with a static 192.168.48.x address, MTU 9000, and no services ticked (NFS does not need a service tag).
What I found on my management host
My DL380 management host had a single vmk0 on the management VLAN, and its mask was 255.255.0.0. That /16 is worse than having no storage vmk. The host believes 192.168.48.100 is on its own local network, so it never even hands NFS to the router. It ARPs for the NAS on the management VLAN, gets no answer, and the mount fails. A vmk on the storage VLAN with a /24 fixes it, because the more specific route wins. I still corrected vmk0 to /24 afterwards, from the DCUI on the iLO console rather than over SSH, since it is the management interface: Configure Management Network → IPv4 Configuration → Subnet Mask, then apply and restart the management network. The host dropped out of vCenter for a few seconds; the VMs never noticed.
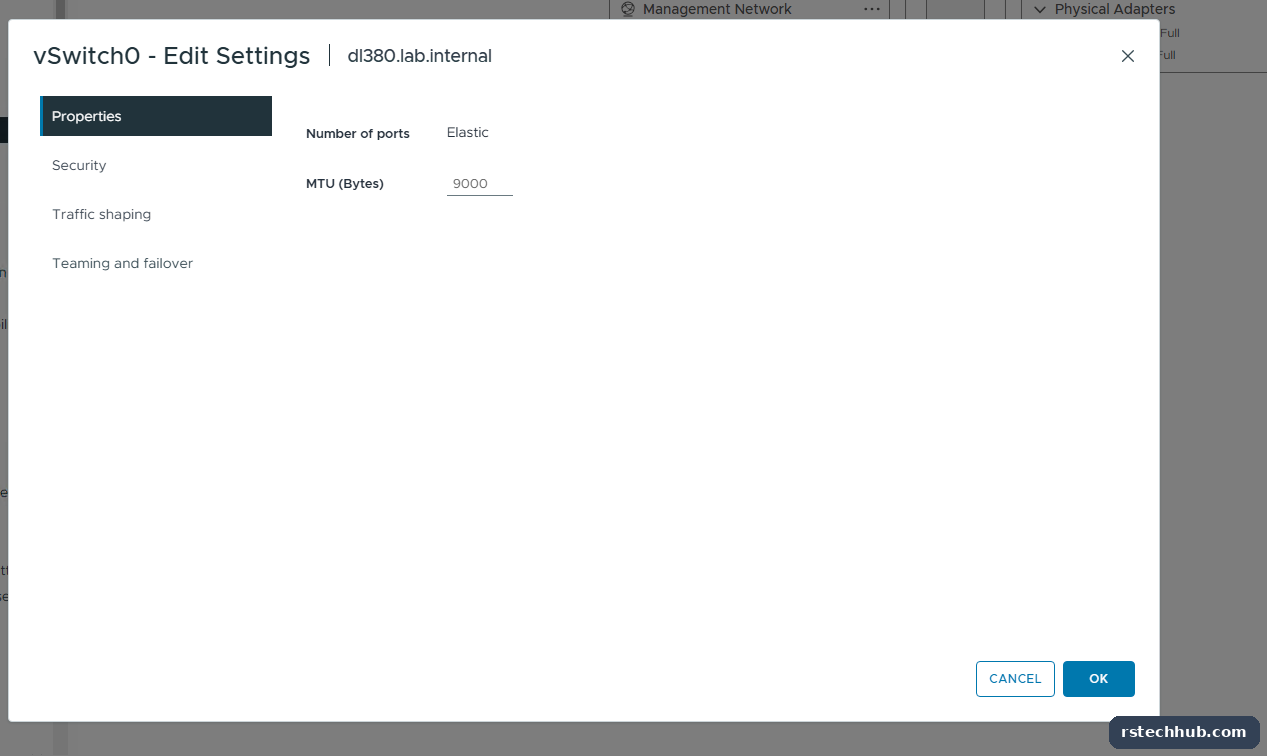
vSwitch0 already had MTU 9000 on its 10GbE uplinks, so the storage vmk went straight onto it. Add Networking → VMkernel Network Adapter:
| Setting | Value |
|---|---|
| Switch | vSwitch0 (existing) |
| Port group | Storage-NFS, VLAN 48 |
| MTU | 9000 |
| IPv4 | Static 192.168.48.10 / 255.255.255.0, no gateway override |
| Services | None |
vmkping -I vmk1 -d -s 8972 192.168.48.100
8980 bytes from 192.168.48.100: icmp_seq=0 ttl=64 time=0.889 ms
8980 bytes from 192.168.48.100: icmp_seq=1 ttl=64 time=0.332 ms
Mount the datastore
From the host shell, as NFS 3:
esxcli storage nfs add -H 192.168.48.100 -s /mnt/tank/vmware -v r620-nfs-vmware
esxcli storage nfs list
Volume Name      Host            Share             Accessible  Mounted  Read-Only
r620-nfs-vmware  192.168.48.100  /mnt/tank/vmware  true        true     false
Update, 2 October 2026: this section originally mounted the datastore as NFS 4.1. It mounted fine and passed every test here, but the first real VM disk created on it later showed 0 bytes on the host while TrueNAS had the full 1 TB, and the VM refused to power on with “The file specified is not a virtual disk”. ESXi 8.0 U3’s NFS 4.1 client was caching a stale file size. Remounting as NFS 3 fixed it immediately, so this guide and the Add-NfsDatastore.ps1 script now use NFS 3. The full story is in The Thin Disk That Was 0 Bytes.
Then a write test, which proves the maproot setting before any VM lands on it:
touch /vmfs/volumes/r620-nfs-vmware/write-test && ls -l /vmfs/volumes/r620-nfs-vmware/
-rw-r--r--    1 root     root    0 Sep 26 13:57 write-test
rm /vmfs/volumes/r620-nfs-vmware/write-test
The list also showed a dead mount from my old OpenMediaVault NAS, which I no longer use. After checking no VMs referenced it, I removed it so it stops raising alarms:
esxcli storage nfs41 remove -v OMW-NFSStep 13: Update before anything depends on it
The alert bell had been telling me since the install that a system update was available. Patch releases carry bug fixes and security fixes, and a NAS holding your backups is a server you want patched. The best time is now, before any datastore or backup job depends on it. A reboot today costs nothing.
1. Save the config first. System → General Settings → Manage Configuration → Download File, and tick Export Password Secret Seed. Without the seed, a restored config cannot decrypt stored passwords or keys. The file holds the certificate and its private key, so keep it somewhere safe, and out of Git.
2. Check what is on offer. System → Update. A point release within your version (25.10.x) is routine: Download and Apply, and let it reboot. A new major version is a different decision. Read its release notes first.
3. Check it came back as you left it.
- https://truenas.lab.internal opens with the padlock (certificate still bound to the UI)
- Storage shows the pool ONLINE (and it survived the reboot, which is worth proving again)
- The shares are still exported:
showmount -e 192.168.48.100
ip -br addr show vlan48
Mine went from 25.10.4 to 25.10.7. After the reboot, all the checks passed:
midclt call system.version
TrueNAS-25.10.7

showmount -e 192.168.48.100
/mnt/tank/veeam          192.168.48.0/24,192.168.10.0/24
/mnt/tank/vcenter-backup 192.168.48.0/24,192.168.10.0/24
/mnt/tank/vmware         192.168.48.0/24

zpool status tank | head -2
  pool: tank
 state: ONLINE
Then keep doing it. I check for updates alongside the rest of the lab maintenance rather than waiting for the bell.
Why I did not join TrueNAS to Active Directory
Everything else in the lab signs in with AD, including Gitea. TrueNAS 25.10 can join a domain too, so it was tempting. I decided against it, and kept the local truenas_admin account.
- NFS does not need it. ESXi, the vCenter appliance and Veeam use host-based NFS. Access is controlled by the allowed networks on each share, not by user accounts, so a domain join adds nothing to the datastore or the backups.
- It creates a dependency loop. Storage and backup targets should depend on as little as possible. If TrueNAS needs AD to let me in, and a DC or vCenter ever sits on its datastore, one outage can lock me out of the thing I need to fix the other.
- Local login is the break-glass. When AD, DNS or time sync has a bad day, the backup server is exactly where I need to get in.
If I add it later, it will be for AD sign-in to the web UI or for SMB shares, and the local admin account stays enabled either way.
Scripts for this post: set-storage-vlan.sh and create-nfs-shares.sh do steps 4 and 10 through the TrueNAS middleware, and Add-NfsDatastore.ps1 does step 11 with PowerCLI. Free on GitHub.
What I would do differently
- Take a config backup (with the secret seed) and apply pending updates before anything depends on the NAS.
- Put a VMkernel adapter on the storage VLAN before mounting NFS, so storage traffic never hits the router.
- Always import pools through the UI or
midclt, never plainzpool import. - Label both ends of every DAC when racking. It would have saved most of step 1.
- Check the switch port mode before assigning an IP. A trunk with
admit-only-vlan-taggedwill silently drop untagged traffic. - Move the gateway in the same change as the interfaces, and keep the iDRAC console open.
- Raise the Test Changes timeout to 300 seconds, or commit from the shell if you know what you are doing.
Next
The NAS is ready for real work. The first job, nightly vCenter file-based backups to the vcenter-backup share, has its own post in the Lab Maintenance series. After that: pointing Veeam at the veeam share, and a full vCenter restore test to prove the backups are good.