
Updated 25 September 2026: added the full build steps, commands and a link to the PowerShell scripts.
With the domain and the certificate authority in place, the core host needed one more thing: a vCenter of its own. The first half covers why it exists and the decisions behind it. The second half is the full build.
PowerShell script for this post: Set-IdracCertificate.ps1, free on GitHub.
Why a separate management vCenter
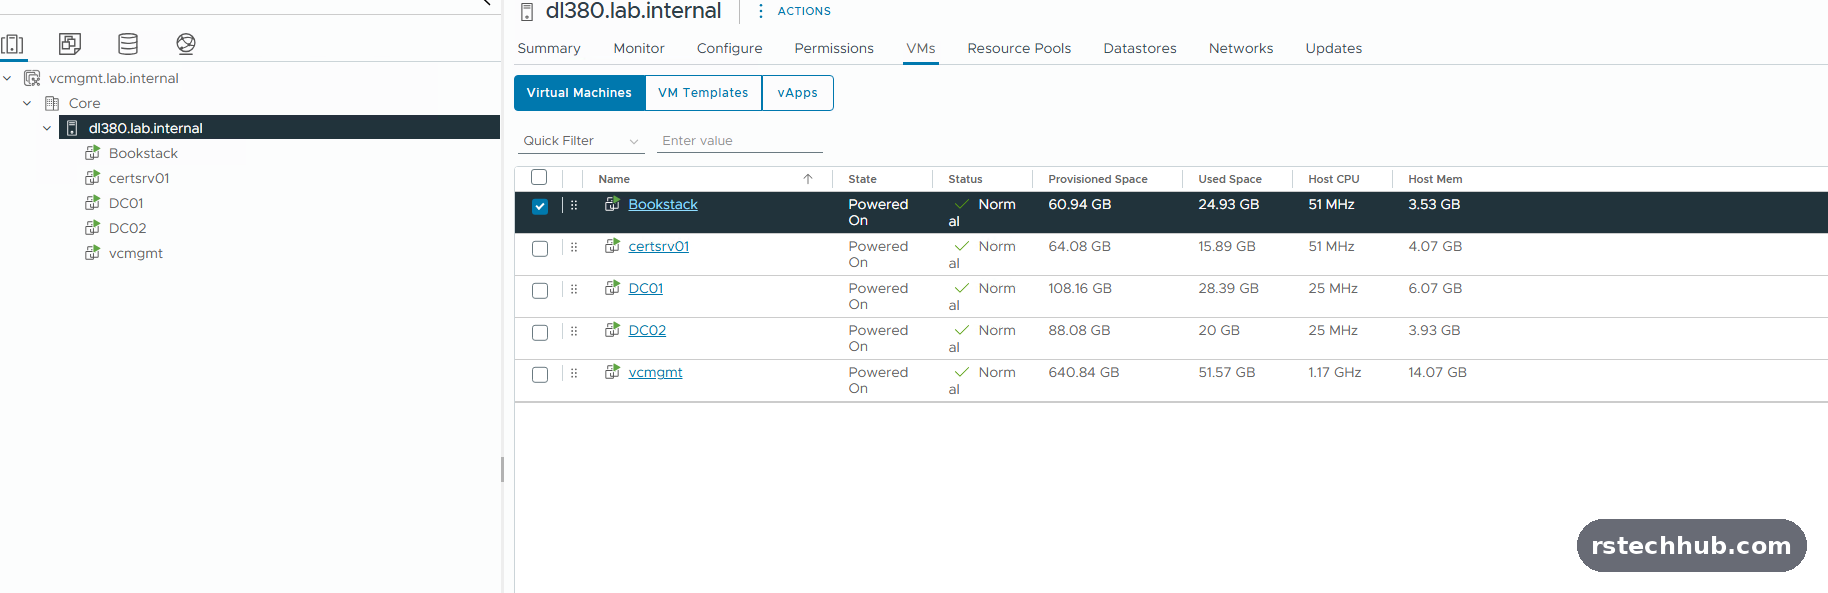
VCF brings its own vCenter, but that one lives inside the VCF domain and goes wherever VCF goes. The core host from Part 2, the nested lab hosts and the storage need a home that stays up while a VCF lab is being rebuilt. So the management vCenter sits on the core host, beside the domain controllers, outside every VCF domain.
Picking the version
vCenter has to be at least as new as every host it manages. My core host runs a recent ESXi 8 patch, so a vCenter build older than that patch would have refused to add it. A quick check of both build numbers before downloading saved a failed deploy.
DNS first
The vCenter installer is strict: the name must resolve forwards and backwards on every DNS server before it will start. That is also where I learned which way AD replication pushes, after a lookup kept returning the old name from the second DC.
Small and thin
The smallest deployment size covers up to ten hosts, which is plenty here, and thin disks keep the real footprint to a fraction of the space it reserves.
Signing in with the domain
vCenter signs in against Active Directory over secure LDAP, using the certificates from Part 4. It has its own admin and read-only groups, separate from the ones VCF will use, so access to each can change without touching the other.
A trusted certificate
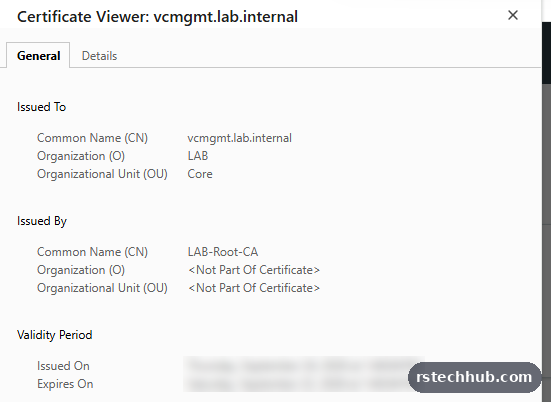
The last step swaps vCenter’s self-signed certificate for one from the lab CA built in Part 4. From then on, any machine that trusts the lab CA opens vCenter with a padlock and no warning.
The build, step by step
The IP addresses below are examples, not the ones in my lab. The management vCenter is vcmgmt.lab.internal (192.168.10.22), deployed on the DL380 (dl380.lab.internal). Here is everything I did, in order.
1. Check the version first
vCenter must be at the same or a newer patch level than every host it manages, or it cannot add them. My DL380 runs ESXi 8.0 U3g (build 24859861), so I deployed vCenter 8.0 U3 build 25197330. Check the host build in the Host Client under Help, About, or with vmware -vl.
2. DNS before anything else
The installer fails if forward and reverse lookups do not match. On dc01:
Add-DnsServerResourceRecordA -ZoneName lab.internal -Name vcmgmt -IPv4Address 192.168.10.22 -CreatePtr
repadmin /syncall /AdeP
On dc02, so it sees the change straight away, then check both DCs answer:
dnscmd /zoneupdatefromds lab.internal
dnscmd /zoneupdatefromds 10.168.192.in-addr.arpa
Clear-DnsServerCache -Force

foreach ($dc in '192.168.10.20','192.168.10.21') {
  Resolve-DnsName vcmgmt.lab.internal -Server $dc -DnsOnly
  Resolve-DnsName 192.168.10.22 -Server $dc -DnsOnly
}
3. Stage 1: deploy the appliance
Mount the ISO and run vcsa-ui-installer\win32\installer.exe, then Install.
| Screen | Setting |
|---|---|
| Deployment target | The ESXi host, port 443, root |
| VM name | VCMGMT |
| Size | Tiny, storage Default |
| Datastore | Enable Thin Disk Mode ticked |
| Network | Management port group, IPv4, static |
| FQDN | vcmgmt.lab.internal (never leave it blank; SSO and certificates are built on it) |
| IP / prefix / gateway | 192.168.10.22 / 24 / 192.168.10.1 |
| DNS | 192.168.10.20,192.168.10.21 |
4. Stage 2: configure
| Setting | Value |
|---|---|
| Time | NTP server 192.168.10.1 |
| SSH | Enabled |
| SSO domain | vsphere.local (new) |
| CEIP | Off |
Afterwards, in VAMI on port 5480, set the root password expiry to never or a long interval so the appliance cannot lock you out.
5. Add the host by name
vCenter keeps whatever you type when you add a host, so use the FQDN. I renamed the host in DNS and in the DCUI (hostname and DNS suffix) first, then created a datacenter called Core and added dl380.lab.internal.
On the host lifecycle page, untick Manage host with an image. The DL380 runs the HPE custom image, and composing a new image could drop HPE drivers during remediation.
Check VM autostart afterwards (host, Configure, VM Startup/Shutdown). Mine had reset to manual with every VM disabled. I moved them back to Automatic ordered one at a time: DC01, DC02, vcmgmt, certsrv01.
6. Sign in with the domain over LDAPS
The vCenter-only groups live next to the VCF ones, so access to each can change on its own. On dc01:
New-ADGroup -Name vsphere-admins   -GroupScope Global -GroupCategory Security -Path "OU=Groups,OU=Lab,DC=lab,DC=internal"
New-ADGroup -Name vsphere-readonly -GroupScope Global -GroupCategory Security -Path "OU=Groups,OU=Lab,DC=lab,DC=internal"
Add-ADGroupMember vsphere-admins -Members <your admin account>
Then Administration, Single Sign On, Configuration, Identity Sources, Add:
| Field | Value |
|---|---|
| Type | Active Directory over LDAP (the dialog defaults to Integrated Windows Authentication, which is deprecated) |
| Base DN users / groups | DC=lab,DC=internal |
| Domain / alias | lab.internal / LAB |
| Bind user | svc-vcf-ldap@lab.internal |
| Servers | ldaps://dc01.lab.internal:636 and ldaps://dc02.lab.internal:636 |
| Certificate | The LAB-Root-CA root certificate |
Set the new source as default, then in Global Permissions give LAB\vsphere-admins the Administrator role (propagate to children) and LAB\vsphere-readonly Read-only.
7. Replace the certificate
Export the root on certsrv01 and convert it to Base64. Certificate Management rejects the binary file with “Error encountered while processing request”, even though the LDAPS identity source accepted it.
New-Item C:\Certs -ItemType Directory -Force
certutil '-ca.cert' C:\Certs\LAB-Root-CA.cer
certutil -encode C:\Certs\LAB-Root-CA.cer C:\Certs\LAB-Root-CA.pem- Administration, Certificates, Certificate Management, Trusted Root: add
LAB-Root-CA.pem. - Machine SSL Certificate: select the row, then Actions, Generate CSR. Common name and SAN
vcmgmt.lab.internal, key size 3072. - Do not generate a second CSR. vCenter holds the private key for the pending request.
Sign it on certsrv01:
cd C:\Certs
certreq -submit -config "certsrv01.lab.internal\LAB-Root-CA" -attrib "CertificateTemplate:WebServer" vcmgmt.csr vcmgmt.cer
Back in vCenter: Actions, Import and Replace Certificate, “Replace with external CA certificate where CSR is generated from vCenter”. Use vcmgmt.cer as the certificate and LAB-Root-CA.pem as the chain. Services restart for about 10 minutes. Mine came back issued by LAB-Root-CA and valid for two years, the WebServer template default.
A machine outside the domain needs the root imported once before the padlock goes clean. The PowerShell import in Part 4 is the method that worked for me.
Scripts
The PowerShell script used in this series is on GitHub: github.com/rstechhub/lab-tools. Set-IdracCertificate.ps1 puts CA-signed certificates on iDRAC 9 controllers, as covered in Part 4. The firmware inventory script belongs to the firmware maintenance post, not this series.
Things that caught me out
The certificate was right, but my own desktop still showed a warning. It is not on the domain, so it had no idea the lab CA existed. Adding the CA through the Windows certificate wizard looked like it worked, yet nothing was actually installed. Doing the same from PowerShell worked first time, and the padlock appeared.
If you hit the same thing, this is the fix. Run it in PowerShell as administrator, pointing at your CA’s certificate file (the file, not the folder it sits in), then restart the browser:
Import-Certificate -FilePath "C:\path\to\Your-Root-CA.cer" -CertStoreLocation Cert:\LocalMachine\Root

# Check it landed: this should list your CA
Get-ChildItem Cert:\LocalMachine\Root | Where-Object Subject -match 'Your-Root-CA'
If the second command returns nothing, the CA is not trusted yet, whatever the wizard said.
Two smaller ones. vCenter wanted the CA certificate in a different file format from the one secure LDAP had accepted a few minutes earlier. And adding the host to vCenter quietly reset its VM start-up order, so the domain controllers would no longer have started first after a power cut.
That completes the core services. Next, the lab moves on to the VCF build itself, starting with Part 1: the MikroTik network.